Your cart is currently empty!
Category: Easy Recipes
-
Papa John’s Pizza Dippers (Homemade & So Easy!)

If you love those cheesy, garlicky Papa John’s Pizza Dippers, you’re in for a treat! These homemade pizza dippers are soft, buttery, and full of flavor — perfect for dipping in warm marinara or garlic butter sauce.
With just a few pantry staples and some simple steps, you’ll have restaurant-style pizza dippers fresh out of your own oven.Let’s get into it — because once that garlic hits the oven, your kitchen will smell amazing.
Ingredients
- 180 ml warm water (about ¾ cup)
- 1 tablespoon olive oil (or melted butter)
- 1 teaspoon active dry yeast
- 1 teaspoon sugar (to activate the yeast)
- 1 ½ cups all-purpose flour (plus a little extra for kneading)
- ½ teaspoon salt
- Extra olive oil for brushing
- Garlic powder (to taste)
- Italian seasoning (to taste)
- Mozzarella cheese (shredded, as much as you like)
- Pepperoni slices (optional, but highly recommended!)
- Parsley (optional, for garnish)
- Marinara or garlic butter for dipping
Instructions
Step 1: Prepare the Dough
In a small bowl, mix together warm water, yeast, and sugar. Stir gently and let it rest for 5–10 minutes, until the surface becomes foamy — that means your yeast is alive and ready to work.
Step 2: Mix the Dough
In a large mixing bowl, combine the flour and salt. Make a small well in the center and pour in your yeast mixture and olive oil. Stir until everything begins to come together.
When it starts looking like dough, transfer it to a floured surface and knead for about 5–7 minutes until smooth and stretchy. Add a touch more flour if it feels sticky.
Step 3: Let it Rise
Shape your dough into a ball, place it in a lightly oiled bowl, and cover with a damp cloth or plastic wrap. Let it rest for 1 hour, or until it doubles in size.
(Pro tip: if your kitchen is cool, place it in a slightly warm oven — turned OFF — to help it rise faster!)
Step 4: Preheat the Oven
Set your oven to 350°F (175°C). Line a baking sheet with parchment paper or brush it with oil. You can also use a pizza stone for that classic crusty bottom.
Step 5: Shape Your Dippers
Once the dough has risen, punch it down to release air. Roll it out on a floured surface into a rectangle or circle — about ¼ inch thick.
For thinner, crispier dippers, roll it even thinner!
Step 6: Add the Flavor
Transfer the dough to your prepared pan.
Brush the top with olive oil (or pizza sauce if you prefer).
Sprinkle generously with garlic powder and Italian seasoning.Add a thick layer of mozzarella cheese and some pepperoni slices on top.
Step 7: Bake
Bake in your preheated oven for 10–15 minutes, or until the crust turns golden and the cheese is melted and bubbly.
If you like extra crispy edges, leave it in for 2–3 more minutes — just keep an eye on it!Step 8: Slice & Serve
Once out of the oven, let your pizza dippers cool for a couple of minutes.
Slice them into thick strips or bite-sized sticks, sprinkle with a little parsley for color, and serve with warm marinara or garlic butter sauce on the side.
Storage Tip
If you have leftovers (though that’s rare!), store them in an airtight container. Reheat in the oven or air fryer for a few minutes to bring back that soft, cheesy goodness.
Why You’ll Love These Pizza Dippers
🍕 Easy to make with pantry staples
🧄 Full of garlicky, buttery flavor
🧀 Stretchy, cheesy, and dip-worthy
❤️ Perfect for parties, game nights, or a cozy snack -

🍕 Little Caesars Crazy Puffs (Made in a Cupcake Pan!)

If you’ve ever had Little Caesars Crazy Puffs, you already know they’re one of those can’t-stop-eating snacks — soft dough, melty cheese, zesty pepperoni, and that buttery garlic flavor that hits just right. The only problem? They disappear fast and don’t come cheap!
So, I decided to make my own copycat Crazy Puffs right at home — using just a can of crescent dough, a few pantry staples, and my trusty cupcake tray. The result? Golden, cheesy, garlicky little pizza cups that taste just like the real deal (if not better). These are perfect for family movie nights, game days, or when that pizza craving hits but you don’t want to order out.
🧄 Ingredients You’ll Need:
- 1 package crescent dough
- Olive oil (for brushing)
- Italian seasoning, to taste
- Garlic powder, to taste
- Mozzarella or pizza blend cheese
- Pepperoni slices
Optional: Melted butter for brushing after baking (for that Crazy Bread-style finish!)
👩🏽🍳 How to Make Copycat Crazy Puffs:
- Preheat your oven to 375°F.
- Lightly grease a cupcake pan with olive oil or nonstick spray.
- Unroll your crescent dough and cut it into 8 even squares (press the seams together if needed).
- Press each dough square into a cupcake cup, shaping it like a little bowl — make sure some dough hangs over the edge so it can puff up beautifully.
- First layer: Add a small spoonful of shredded cheese and one slice of pepperoni to the bottom.
- Second layer: Add another sprinkle of cheese and another slice of pepperoni right on top — because one layer just isn’t enough! 😋
- Brush the tops lightly with olive oil and sprinkle with garlic powder and Italian seasoning.
- Bake for 12–15 minutes, or until golden brown, bubbly, and slightly crisp on the edges.
- Optional finishing touch: Brush with melted butter and a pinch more garlic powder and Italian seasoning right after baking for that signature Crazy Bread flavor.
🍽️ Serving Ideas:
Serve your puffs warm with a side of marinara sauce, pizza sauce, or even ranch dressing for dipping. These are perfect for:
- After-school snacks 🍴
- Game night appetizers 🏈
- Party trays or potlucks 🎉
- A fun pizza-night twist for the family 🍕
💡 Tips for Perfect Crazy Puffs:
- Use a cupcake pan — it helps the dough puff up and hold all that cheesy filling.
- Don’t skip the butter at the end! It makes them taste exactly like Little Caesars’ buttery, garlicky goodness.
- Try different toppings — sausage, cooked bacon, or even diced veggies work great too.
- Serve hot and fresh — they taste best right out of the oven when the cheese is still melty and gooey.
❤️ Why You’ll Love These:
- Made with simple grocery store ingredients
- No pizza dough kneading required
- Ready in about 20 minutes
- Family and kid-approved
- Perfect Little Caesars dupe — but even fresher!
📌 Save this recipe to your Easy Snacks, Copycat Recipes, or Family Favorites board — because once you make these, you’ll never look at regular pizza the same again!
-
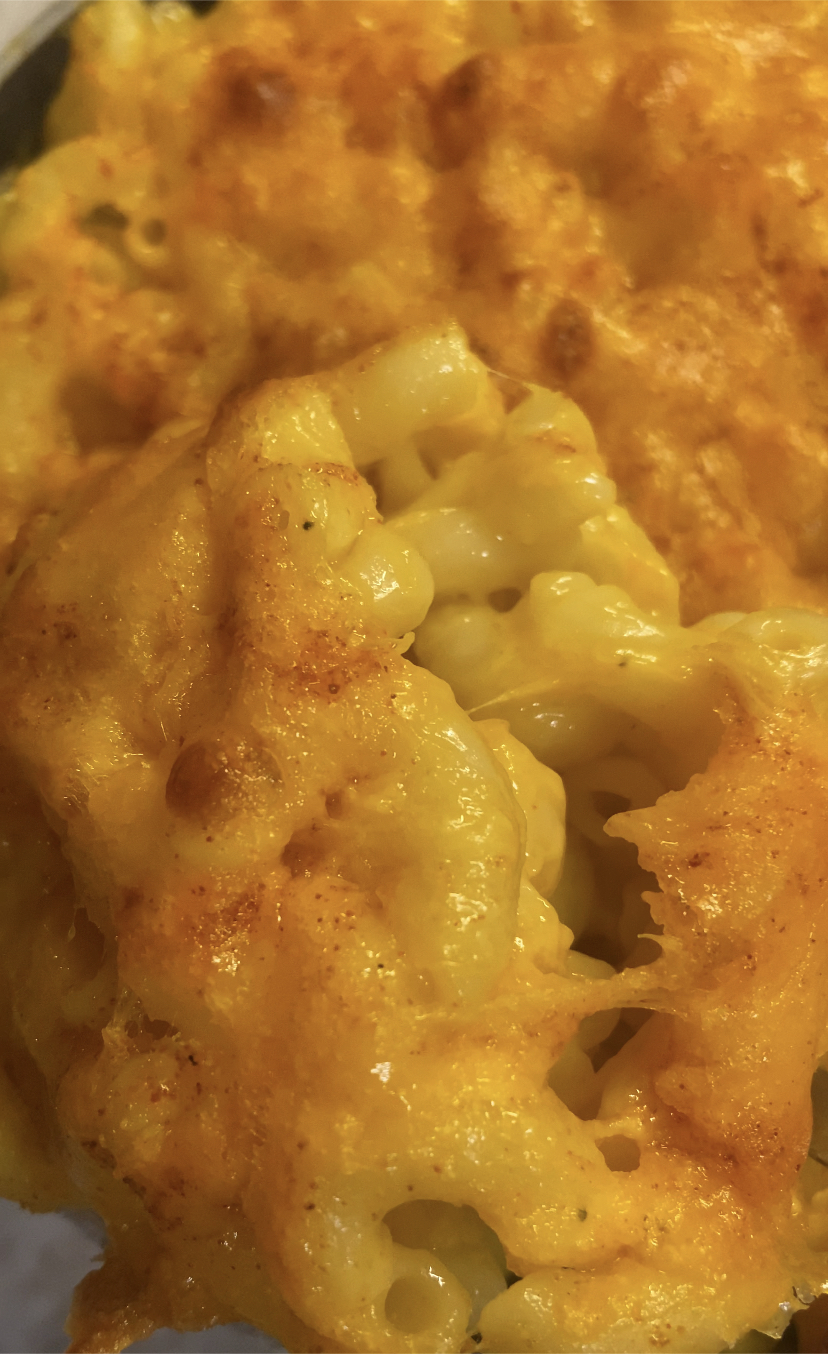
Easy One-Cheese Baked Macaroni (Weeknight, Kid & Adult Approved!)

When it comes to comfort food, nothing beats a bubbling dish of baked macaroni and cheese. But sometimes you just need something simple—no fuss, no long list of ingredients, just real cheesy goodness. That’s where this Super Easy One-Cheese Baked Macaroni comes in.
With just a box of pasta, a bag of sharp cheddar, and a few pantry staples, you can have a family-friendly dinner that feels special without taking all night. The stovetop prep is quick, and finishing it off in the oven gives you that golden, cheesy topping everyone loves.
Kids will devour it, adults will sneak seconds, and you’ll appreciate how fast and budget-friendly it is.
Recipe: Super Easy One-Cheese Baked Macaroni
Servings: 4–6
Time: 35 minutesIngredients:
- 1 (16 oz) box elbow macaroni (or any short pasta)
- 2 ½ cups shredded sharp cheddar cheese (divided)
- ½ stick (4 tbsp) unsalted butter
- Salt (for pasta water + seasoning)
- ½ tsp black pepper (or to taste)
- ½ tsp paprika (optional, for flavor and color)
Instructions:
- Cook the pasta
- Bring a large pot of salted water to a boil.
- Add macaroni and cook according to package directions until al dente.
- Drain and transfer pasta to a large mixing bowl.
- Mix the base
- While pasta is still warm, add butter and stir until melted.
- Add about 2 cups of shredded sharp cheddar cheese, mixing until melted and creamy.
- Season with salt, black pepper, and paprika to taste.
- Assemble for baking
- Pour the cheesy pasta mixture into a lightly greased baking dish.
- Top evenly with the remaining ½ cup shredded cheddar cheese.
- Bake
- Place in a preheated oven at 375°F (190°C) for about 15–20 minutes, or until the top is melted, bubbly, and slightly golden.
- Serve
- Spoon into bowls or onto plates and enjoy hot!
Tips & Tricks:
- For extra creaminess, mix in a splash of milk with the cheese.
- Want a little crunch? Sprinkle breadcrumbs mixed with melted butter on top before baking.
- Leftovers reheat best in the oven with a touch of extra cheese.
This baked version takes your one-cheese macaroni up a notch—crispy on top, gooey in the middle, and still super easy. Perfect for busy weeknights, family dinners, or when you just want cozy comfort food without the effort.
-

Easy Strawberry Cheesecake bites: A Perfect Valentine’s Day Dessert!

Valentine’s Day is the perfect occasion to indulge in something sweet and share a little love. If you’re looking for a dessert that’s easy to make, visually stunning, and absolutely delicious, these Heart-Shaped Chocolate-Covered Strawberry Cheesecake Bites are the answer! They’re the perfect blend of creamy cheesecake, fresh strawberries, and rich chocolate—plus, they’re bite-sized for easy serving.
Here’s how to make this show-stopping dessert:
Ingredients:
- 1 cup graham cracker crumbs
- 3 tbsp unsalted butter, melted
- 8 oz cream cheese, softened
- 1/3 cup granulated sugar
- 1 tsp vanilla extract
- 1 cup fresh strawberries, finely diced
- 8 oz semi-sweet chocolate chips or melting chocolate
- 1 tsp coconut oil (optional, for smoother chocolate coating)
- Heart-shaped silicone mold (optional but highly recommended)
Instructions:
1. Prepare the Crust
- In a small bowl, mix the graham cracker crumbs with the melted butter until the texture resembles wet sand.
- Press about 1 teaspoon of the mixture firmly into the bottom of each heart-shaped mold cavity. Place the mold in the freezer while you prepare the filling.
2. Make the Cheesecake Filling
- In a medium mixing bowl, beat the cream cheese, sugar, and vanilla extract until smooth and creamy.
- Gently fold in the finely diced strawberries until evenly distributed.
- Spoon the cheesecake mixture on top of the crust in the mold, filling each cavity almost to the top. Smooth the surface with the back of a spoon.
- Freeze the mold for at least 2 hours or until the cheesecake bites are firm and easy to remove.
3. Coat with Chocolate
- Melt the chocolate chips in a microwave-safe bowl in 30-second intervals, stirring between each until fully melted. Stir in the coconut oil for a shinier finish if desired.
- Remove the cheesecake bites from the mold and dip each one into the melted chocolate, ensuring they are fully coated. Use a fork to lift them out, letting any excess chocolate drip off.
- Place the chocolate-covered bites on a parchment-lined baking sheet.
- If you’d like, decorate with sprinkles, a drizzle of white chocolate, or edible glitter for an extra festive touch.
4. Chill and Serve
Place the baking sheet in the refrigerator for 20-30 minutes to allow the chocolate to set. Serve the bites chilled on a decorative plate or tiered dessert stand for a Pinterest-worthy presentation.
Tips for Success:
- Use high-quality chocolate for the best flavor and texture.
- Customize the filling by substituting strawberries with raspberries or cherries.
- Add a romantic touch by sprinkling crushed freeze-dried strawberries or edible rose petals on top before the chocolate sets.
Why This Dessert is Perfect for Valentine’s Day
These Heart-Shaped Chocolate-Covered Strawberry Cheesecake Bites are the ultimate combination of romance and indulgence. They’re easy to share, customizable, and almost too pretty to eat. Whether you’re hosting a Valentine’s Day dinner or surprising your loved one with a homemade treat, this dessert is sure to impress.
Take a picture before serving and share your creation on Pinterest or Instagram—you’ll be the talk of the dessert table! Happy Valentine’s Day and happy baking!
-
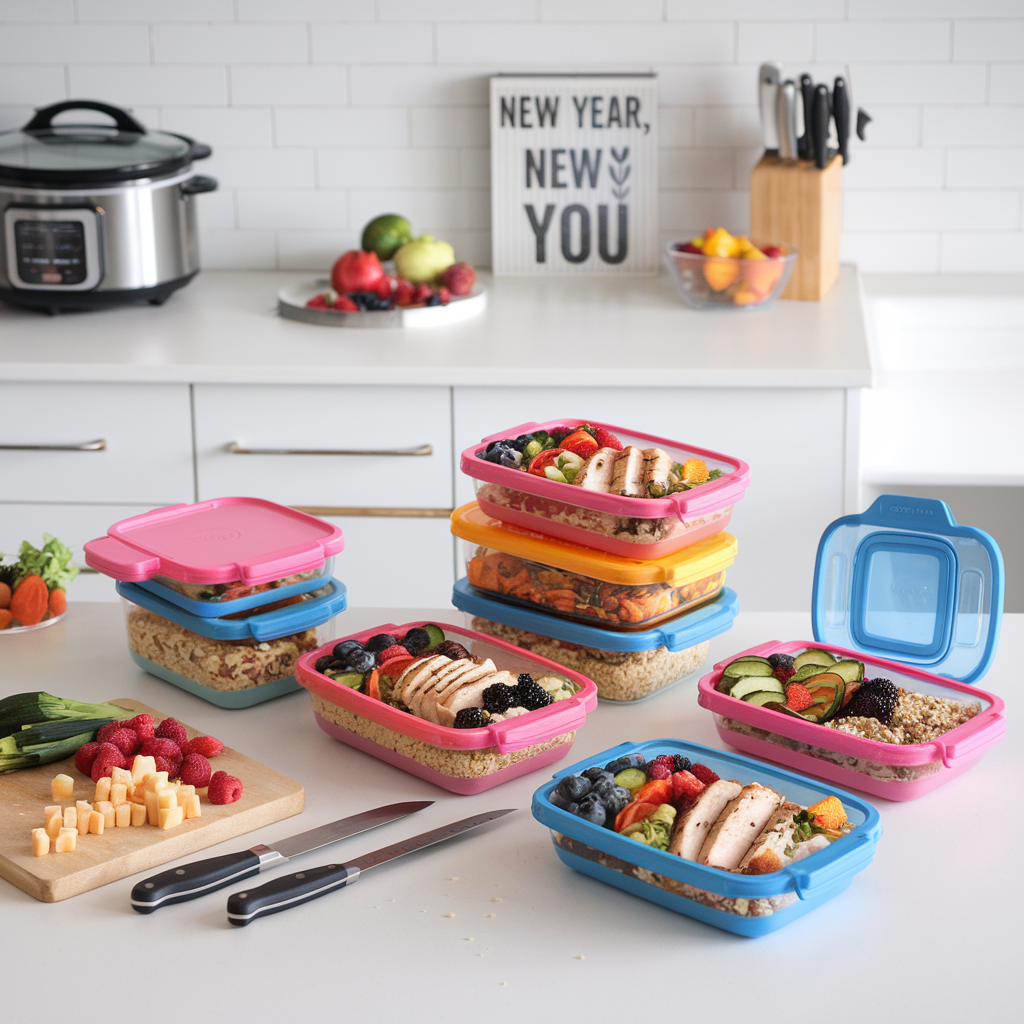
Meal Prep for the New Year: A Beginner’s Guide

As the new year begins, many of us set goals to eat healthier, save money, and reduce stress. Meal prep is the perfect solution to help you achieve these goals while keeping your schedule on track. Whether you’re new to meal prep or looking to refine your routine, this guide will help you start the new year on the right foot.
Why Meal Prep?
Meal prep isn’t just about saving time—it’s a game-changer for maintaining a balanced diet, avoiding takeout, and reducing food waste. Here are some benefits:
- Healthier Eating: Having pre-portioned meals ensures you stick to your gigoals.
- Saves Money: Buying in bulk and preparing meals at home is far more cost-effective than eating out.
- Reduces Stress: Knowing what you’re eating throughout the week eliminates the daily “what’s for dinner?” dilemma.
Step 1: Plan Your Meals
Start with a simple plan that covers the basics:
- Assess Your Week: Consider your schedule and identify how many meals and snacks you’ll need.
- Choose Recipes: Pick meals you enjoy and are easy to prepare. Aim for a mix of proteins, vegetables, and grains.
- Create a Grocery List: Write down everything you’ll need, grouped by category (e.g., produce, pantry items, proteins).
Step 2: Invest in Tools
The right tools can make meal prep much easier. Here’s what you’ll need:
- Food Storage Containers: Opt for stackable, BPA-free containers in various sizes. For containers click here
- Sharp Knife: A quality chef’s knife speeds up chopping.
- Sheet Pans: Perfect for roasting large batches of veggies and proteins.
- Slow Cooker or Instant Pot: Great for hands-off cooking.
- Measuring Cups and Spoons: Ensure portion accuracy.
Step 3: Meal Prep Like a Pro
Follow these steps to streamline your prep day:
- Cook in Bulk: Prepare large portions of grains, proteins, and vegetables.
- Batch Cook Proteins: Grill chicken, bake salmon, or cook tofu in advance.
- Wash and Chop Produce: Have veggies ready to cook or eat raw as snacks.
- Use Versatile Ingredients: Choose ingredients that work across multiple recipes (e.g., rice, roasted veggies, shredded chicken).
Sample Meal Prep Menu
Here’s a simple plan to get you started:
Breakfasts:
- Overnight oats with almond butter and fresh berries.
- Egg muffins with spinach and cheese.
Lunches:
- Grilled chicken with quinoa and roasted vegetables.
- Turkey and avocado wraps with a side of baby carrots.
Dinners:
- Baked salmon with brown rice and steamed broccoli.
- Stir-fry with tofu, mixed vegetables, and soba noodles.
Snacks:
- Greek yogurt with granola.
- Hummus with cucumber and bell pepper slices.
- Handful of mixed nuts.
Tips for Staying Consistent
- Start Small: Prep for just 2-3 days at a time to avoid overwhelm.
- Rotate Recipes: Prevent boredom by switching up your meals weekly.
- Label Your Meals: Write the contents and date on each container for easy identification.
- Stay Flexible: Life happens—it’s okay to adjust your plan.
Final Thoughts
Meal prep is a powerful tool to help you stick to your goals and make the most of your time in the new year. By starting with a clear plan, the right tools, and simple recipes, you can set yourself up for success. Remember, it’s not about perfection—it’s about progress. Here’s to a healthier, more organized year ahead!
-

How to Create Stunning Grazing Boards for Your Next Party

Disclosure: This post may contain affiliate links. If you make a purchase through these links, I may earn a small commission at no extra cost to you.
Grazing boards have taken the entertaining world by storm, and for good reason. These beautiful, bountiful boards are perfect for any occasion, offering a delicious variety of foods that appeal to every palate. Whether you’re hosting a casual get-together or a formal event, a well-crafted grazing board is sure to impress your guests.
Here’s a guide to creating the ultimate grazing board, complete with a list of must-have items to include.
Step 1: Choose Your Theme
Before you start assembling your grazing board, decide on a theme that aligns with your event. Some popular themes include:
- Classic Charcuterie: A mix of meats, cheeses, and crackers.
- Sweet Treats: Desserts and candies.
- Breakfast Spread: Bagels, spreads, and fruits.
- Seasonal Flair: Incorporate foods that reflect the season.
Your theme will guide your choices for ingredients, colors, and presentation style.
Step 2: Select the Base Click here for grazing board
You’ll need a sturdy surface for your grazing board. Options include:
- Wooden cutting boards
- Slate or marble trays
- Large serving platters
- Parchment paper laid directly on a clean table for a rustic look
Step 3: Plan Your Food Selection
A balanced grazing board includes a variety of textures, flavors, and colors. Use this list to inspire your selection:
1. Cheeses:
- Aged (e.g., cheddar, gouda)
- Soft (e.g., brie, camembert)
- Blue (e.g., gorgonzola, stilton)
- Fresh (e.g., mozzarella, goat cheese)
2. Meats:
- Cured meats (e.g., prosciutto, salami, chorizo)
- Smoked meats (e.g., smoked turkey or ham)
3. Crackers and Breads:
- Assorted crackers (e.g., multigrain, sesame, water crackers)
- Sliced baguette
- Breadsticks
4. Fresh Fruits:
- Grapes
- Berries (e.g., strawberries, blueberries, raspberries)
- Apple or pear slices (brush with lemon juice to prevent browning)
5. Dried Fruits and Nuts:
- Dried apricots, figs, or mango slices
- Almonds, cashews, or pistachios
- Candied pecans
6. Vegetables:
- Baby carrots
- Cherry tomatoes
- Cucumber slices
- Bell pepper strips
7. Dips and Spreads:
- Hummus
- Olive tapenade
- Honey or fruit preserves
- Mustard or aioli
8. Extras for Flair:
- Fresh herbs (e.g., rosemary, thyme)
- Edible flowers
- Dark chocolate pieces or truffles
Step 4: Assemble the Board
When assembling your grazing board, keep these tips in mind:
- Start with the larger items: Place cheeses, bowls for dips, and bigger fruits like grapes first.
- Add meats: Arrange them in folds or rolls for visual interest.
- Fill gaps with smaller items: Use crackers, nuts, and smaller fruits to fill any empty spaces.
- Balance colors and textures: Distribute bright and neutral tones evenly for a harmonious look.
- Garnish: Finish with fresh herbs or edible flowers for added elegance.
Step 5: Serve and Enjoy
Set your grazing board out shortly before guests arrive to keep everything fresh. Include small serving utensils like cheese knives, tongs, and spoons to make it easy for guests to help themselves.
Final Thoughts
Creating a grazing board is as much an art as it is a science. With the right mix of ingredients and a touch of creativity, your board will be a show-stopping centerpiece at your next party. Don’t be afraid to experiment and adapt the board to your tastes or dietary preferences. Happy grazing!
-

Easy Ground Beef Chili: A Comfort Food Classic

Chili is a classic comfort food, but adding ground beef takes it to the next level by introducing a hearty texture and even more flavor. This updated recipe is perfect for family dinners, potlucks, or a cozy night in. Using a mix of pantry staples and fresh ground beef, you’ll have a rich, delicious chili on the table in under an hour.
Here’s the ultimate ground beef chili recipe that serves 6-8 and is ready in just 50 minutes.
Ingredients:
- 1 pound ground beef
- 4 cups water
- 1 chicken bouillon cube
- 1 beef bouillon cube
- 1 tablespoon Better Than Bouillon Beef
- 1 tablespoon onion powder
- 1 tablespoon Tony’s Creole Seasoning
- 1 can Bush’s chili beans (15 oz)
- 1 can red kidney beans (15 oz), drained and rinsed
- 1 can diced tomatoes and chilies (10 oz)
- 1 packet McCormick chili seasoning
Instructions:
Prep Time: 10 minutes
Cook Time: 40 minutes
- Brown the Ground Beef
In a large pot or Dutch oven, cook the ground beef over medium heat until browned, breaking it into small crumbles with a spoon. Drain any excess fat and set the beef aside. - Prepare the Base
In the same pot, bring 4 cups of water to a simmer over medium heat. Add the chicken bouillon cube, beef bouillon cube, and Better Than Bouillon Beef. Stir until dissolved to create a flavorful broth. - Add Seasonings
Stir in the onion powder and Tony’s Creole Seasoning. Mix well to combine. - Combine Beans, Tomatoes, and Beef
Add the Bush’s chili beans (with liquid), drained red kidney beans, diced tomatoes and chilies, and the cooked ground beef. Stir to incorporate everything evenly. - Season with McCormick Chili Packet
Sprinkle in the McCormick chili seasoning packet and mix thoroughly. - Simmer and Develop Flavors
Reduce the heat to low and let the chili simmer for 30 minutes, stirring occasionally. This allows the flavors to meld and the beef to soak up the spices. - Taste and Adjust
After simmering, taste the chili and adjust the seasoning as needed. Add more Creole seasoning for a kick or salt for balance. - Serve and Enjoy
Ladle the chili into bowls and serve hot. Top with shredded cheese, sour cream, or diced onions, and pair with cornbread or tortilla chips.
Serving Suggestions:
This chili serves 6-8 people. It’s hearty enough to be a meal on its own, but it also pairs beautifully with sides like rice or baked potatoes.
Adding ground beef to this chili makes it a true crowd-pleaser. It’s rich, filling, and packed with bold flavors. Perfect for busy weeknights or lazy weekends, this recipe is sure to become a favorite in your household. Enjoy! 🌶️
-
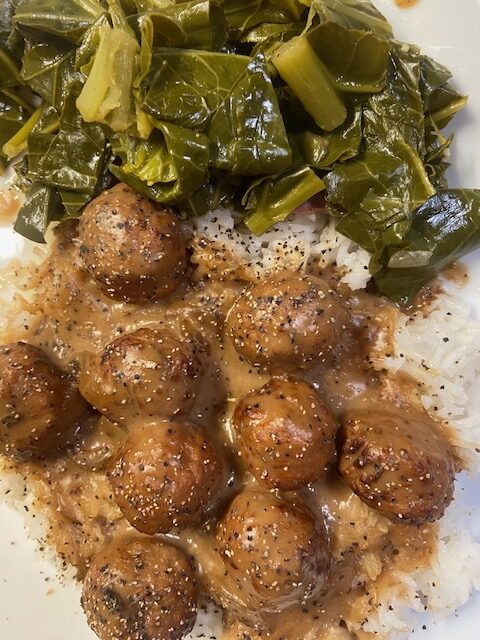
Easy Homemade Crockpot Salisbury Meatballs

When life gets busy, having a simple, hearty meal in your recipe arsenal can be a lifesaver. These Easy Crockpot Salisbury Meatballs are a family-friendly dinner option that you can whip up with just a handful of ingredients. Perfect for busy weeknights or cozy weekends, this recipe combines the comforting flavors of classic Salisbury steak with the convenience of frozen meatballs and a slow cooker.
The creamy mushroom sauce, paired with tender meatballs, is a crowd-pleaser that will leave everyone coming back for seconds. Serve these meatballs over mashed potatoes, rice, or egg noodles, and you’ll have a comforting meal that’s ready with minimal effort. Let’s dive in!
Easy Crockpot Salisbury Meatballs Recipe
Ingredients:
- 1 (28-32 oz) bag of frozen meatballs (beef or turkey work well)
- 2 cans (10.5 oz each) condensed cream of mushroom soup
- 1 tablespoon Worcestershire sauce
- 1 cup beef broth (or water for a lighter option)
- 1 small onion, finely chopped (optional)
- 1 teaspoon garlic powder
- 1 teaspoon onion powder
- Salt and pepper to taste
Optional Garnish:
- Chopped fresh parsley
Instructions:
- Prepare the Crockpot: Lightly spray the inside of your crockpot with non-stick cooking spray or line it with a slow cooker liner for easy cleanup.
- Combine the Sauce: In a medium bowl, whisk together the cream of mushroom soup, Worcestershire sauce, beef broth, garlic powder, onion powder, salt, and pepper. If using onions, add them to the mix.
- Add the Meatballs: Place the frozen meatballs into the crockpot. Pour the prepared sauce evenly over the meatballs, ensuring they are well-coated.
- Cook: Cover and cook on low for 4-5 hours or on high for 2-3 hours. Stir occasionally to ensure the sauce doesn’t stick and the meatballs are evenly heated.
- Serve: Once cooked through and hot, serve the Salisbury meatballs over your favorite base, such as mashed potatoes, rice, or noodles. Garnish with fresh parsley if desired.
Tips for Success:
- Customize the Sauce: Add a splash of soy sauce for extra umami, or a pinch of paprika for added depth.
- Vegetable Boost: Toss in sliced mushrooms or frozen peas during the last hour of cooking for added texture and nutrients.
- Make It Creamier: Stir in ½ cup of sour cream or heavy cream before serving for a richer sauce.
This easy Salisbury meatballs recipe is a stress-free dinner solution that delivers comfort and flavor with minimal effort. Whether you’re cooking for a busy family or meal prepping for the week, this dish will quickly become a favorite in your rotation. Enjoy!
-
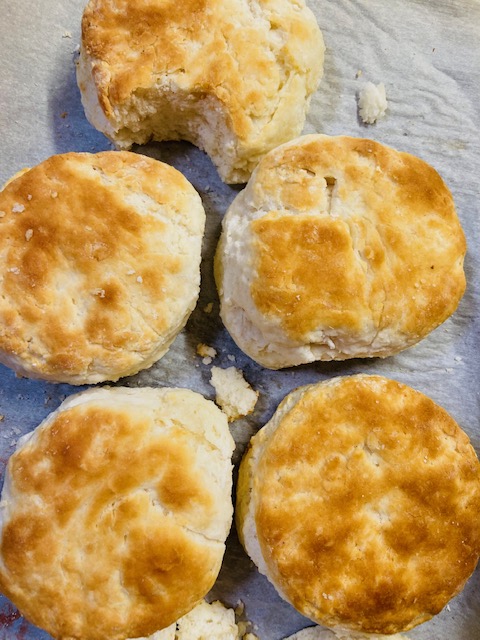
Fluffy, Tender Angel Biscuits: A Easy Recipe for Baking Bliss

There’s a certain magic in baking, and nothing captures that magic quite like angel biscuits. These delightful treats are a hybrid of classic buttermilk biscuits and yeast rolls, giving you the best of both worlds: a tender crumb, a slight tang, and just the right amount of fluff. Whether you’re a seasoned baker or just starting your kitchen journey, this recipe is designed for simplicity and success.
What Are Angel Biscuits?
Angel biscuits are aptly named for their light, airy texture. They’re unique because they incorporate both leavening agents—baking soda and yeast—which combine to create their signature rise. Think of them as the ultimate crowd-pleaser: buttery, slightly sweet, and endlessly versatile.
Why Use Self-Rising Flour?
Using self-rising flour simplifies the process, saving you from measuring out additional ingredients like baking powder. It’s a shortcut that doesn’t compromise quality, making it an ideal choice for beginner and experienced bakers alike.
The Perfect Angel Biscuit Recipe
This scaled-down recipe makes about 8-10 biscuits, perfect for a cozy breakfast or dinner side. The steps are straightforward, and the ingredients are pantry staples, so you can whip these up anytime the craving strikes.
What You’ll Need:
- Self-rising flour: Ensures a consistent rise.
- Cold butter: Creates flaky layers as it melts during baking.
- Buttermilk: Adds richness and tang.
- Active dry yeast: Provides that characteristic pillowy texture.
Ingredients
- 2 1/4 cups (270g) self-rising flour
- 2 tablespoons (25g) granulated sugar
- 1/2 teaspoon baking soda
- 1 1/8 teaspoons (half a packet) active dry yeast
- 2 tablespoons (30ml) warm water (about 110°F/45°C)
- 1/4 cup (56.5g) cold unsalted butter, cubed
- 1 cup (240ml) buttermilk, cold
- 1 tablespoon melted butter (for brushing, optional)
Instructions
1. Activate the Yeast
In a small bowl, dissolve the yeast in warm water. Let it sit for 5-10 minutes until it becomes frothy. This step ensures the yeast is active.
2. Mix the Dry Ingredients
In a large mixing bowl, whisk together the self-rising flour, sugar, and baking soda.
3. Cut in the Butter
Add the cold, cubed butter to the dry ingredients. Use a pastry cutter or your fingertips to work the butter into the flour until the mixture resembles coarse crumbs. Work quickly to prevent the butter from melting.
4. Combine the Wet and Dry Ingredients
Add the frothy yeast mixture and cold buttermilk to the flour mixture. Stir gently until a sticky dough forms. Avoid overmixing to keep the biscuits tender. Add a little bit of flour at a time if dough is too sticky.
5. Chill the Dough (Optional but Recommended)
Cover the dough and refrigerate for at least 30 minutes, or up to overnight. This helps relax the gluten and makes the dough easier to handle.
6. Roll and Cut the Biscuits
Preheat your oven to 400°F (200°C). Lightly flour a clean surface and roll out the dough to about 1/2-inch thickness. Use a biscuit cutter or a glass to cut out rounds. Re-roll scraps as needed.
7. Bake
Place the biscuits on a greased or parchment-lined baking sheet, leaving a little space between each. Bake for 12-15 minutes, or until the tops are golden brown.
8. Brush with Butter (Optional)
If desired, brush the hot biscuits with melted butter for extra flavor and shine.
Tips for Baking Success
- Work quickly: Keep the butter cold for those flaky layers.
- Don’t twist your cutter: Press straight down to help your biscuits rise evenly.
- Customize your biscuits: Brush with melted butter or sprinkle with herbs for an extra touch of flavor.
Why You’ll Love These Biscuits
Angel biscuits aren’t just bread—they’re a comforting addition to any table. Whether served warm with a drizzle of honey, as a sandwich base, or paired with savory dishes like fried chicken, they’re always a hit. Plus, they’re easy to make ahead, so you can enjoy fresh biscuits any day of the week.
Ready to try your hand at these heavenly biscuits? Grab your ingredients and let the baking begin!
-
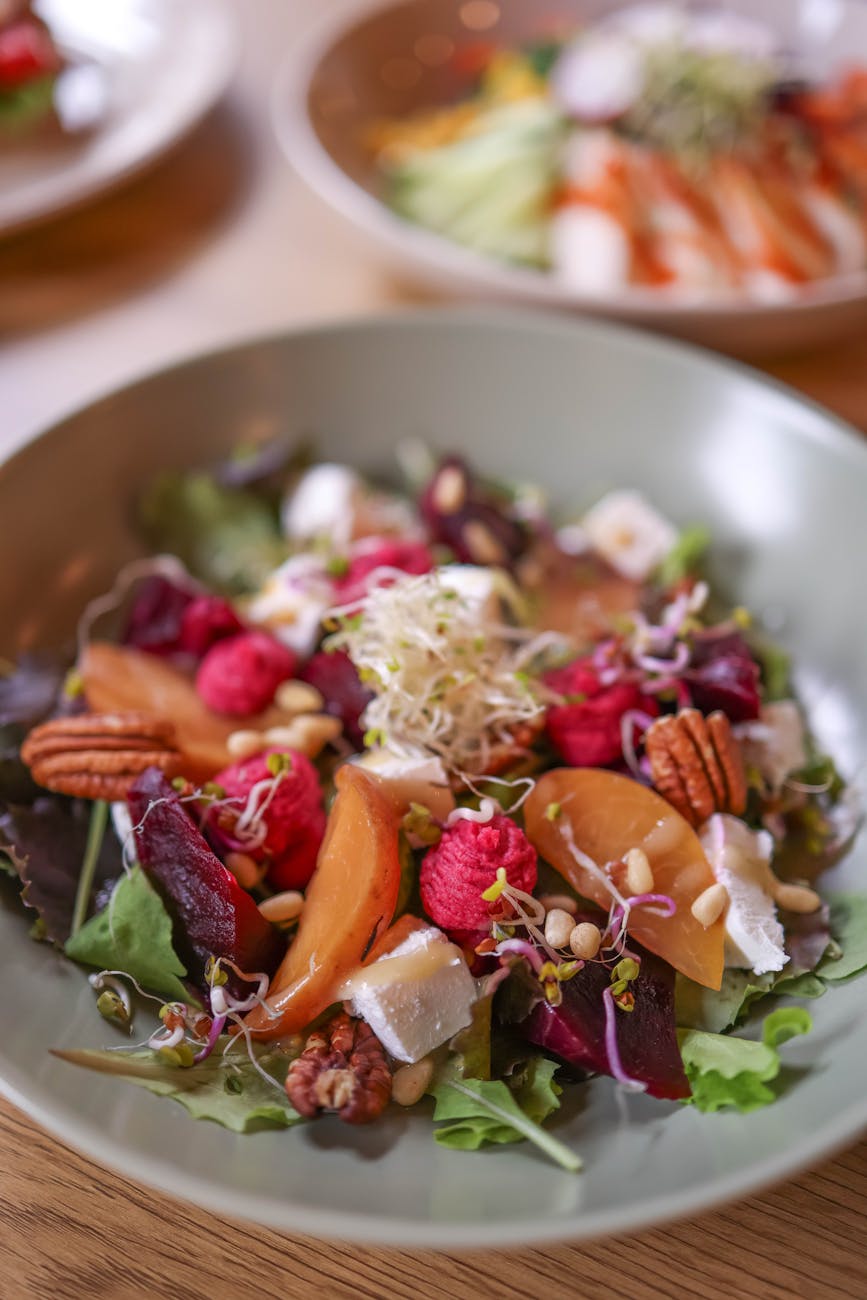
Easy Pear Winter Salad: A seasonal Delight

Photo by Valeria Boltneva on Pexels.com Winter is the perfect time to enjoy salads that highlight fresh, seasonal ingredients. This Pear Winter Salad combines the sweetness of ripe pears with the crunch of nuts, the creaminess of cheese, and the brightness of a homemade vinaigrette. Whether you’re hosting a dinner party or looking for a light yet satisfying dish, this salad is a must-try.
Why This Salad Works
Winter salads often feature heartier greens and bold flavors to complement the season’s comforting dishes. This pear winter salad strikes the perfect balance:
- Sweet and Savory: The natural sweetness of pears pairs beautifully with the salty tang of cheese.
- Crunch Factor: Toasted nuts and fresh greens add a satisfying texture.
- Seasonal Ingredients: Highlighting pears and hearty greens like kale or arugula makes this salad both fresh and timely.
Ingredients
For the Salad:
- 4 cups mixed winter greens (e.g., arugula, spinach, kale, or radicchio)
- 2 ripe pears, thinly sliced (such as Bosc or Anjou)
- 1/4 cup dried cranberries or pomegranate arils
- 1/3 cup crumbled blue cheese or goat cheese
- 1/3 cup toasted pecans or walnuts
- 1/4 cup thinly sliced red onion (optional)
For the Dressing:
- 3 tablespoons olive oil
- 1 tablespoon apple cider vinegar
- 1 tablespoon fresh lemon juice
- 1 teaspoon honey or maple syrup
- 1 teaspoon Dijon mustard
- Salt and freshly ground black pepper, to taste
Step-by-Step Instructions
1. Prepare the Dressing
In a small bowl or jar, whisk together the olive oil, apple cider vinegar, lemon juice, honey, and Dijon mustard. Season with salt and pepper to taste. Set aside.
2. Assemble the Salad
In a large bowl, combine the winter greens, sliced pears, cranberries or pomegranate arils, and red onion if using. Gently toss to mix.
3. Add the Toppings
Sprinkle the salad with crumbled cheese and toasted nuts for flavor and texture.
4. Dress the Salad
Drizzle the dressing over the salad just before serving. Toss gently to ensure all ingredients are coated.
Tips for Success
- Choose the Right Pears: Opt for pears that are ripe but firm to avoid them becoming mushy in the salad.
- Toast Your Nuts: Toasting nuts enhances their flavor and adds an extra layer of depth to the dish.
- Prep Ahead: While the salad is best assembled fresh, you can prepare the dressing and slice the pears ahead of time for quick assembly.
Serving Suggestions
This pear winter salad is versatile and pairs beautifully with a variety of dishes:
- As a side to roasted meats like chicken, turkey, or pork.
- Alongside a hearty soup or stew for a balanced meal.
- As a light main course with the addition of grilled chicken or shrimp.
Why You’ll Love This Salad
Not only is this salad visually stunning with its mix of colors and textures, but it’s also packed with flavor. The combination of sweet pears, tangy cheese, and a zesty dressing makes it a standout dish that’s perfect for any occasion.
So, grab those fresh winter greens and juicy pears, and treat yourself to this delicious seasonal salad. Your taste buds will thank you!
Share Your Creation! If you try this recipe, we’d love to hear from you. Leave a comment or tag us on social media with your winter salad creations. Happy cooking!