Your cart is currently empty!
Category: Breakfast
-
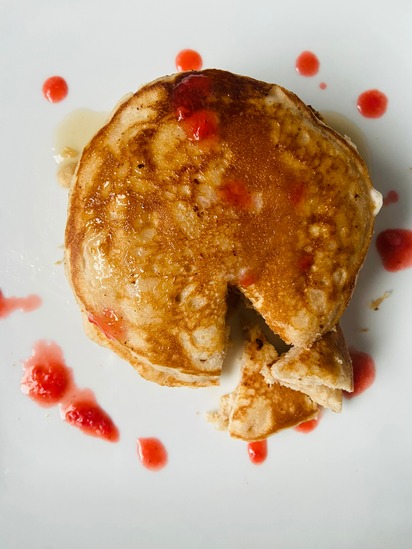
Easy Fluffy White Lily Pancakes Recipe (Kid approved)

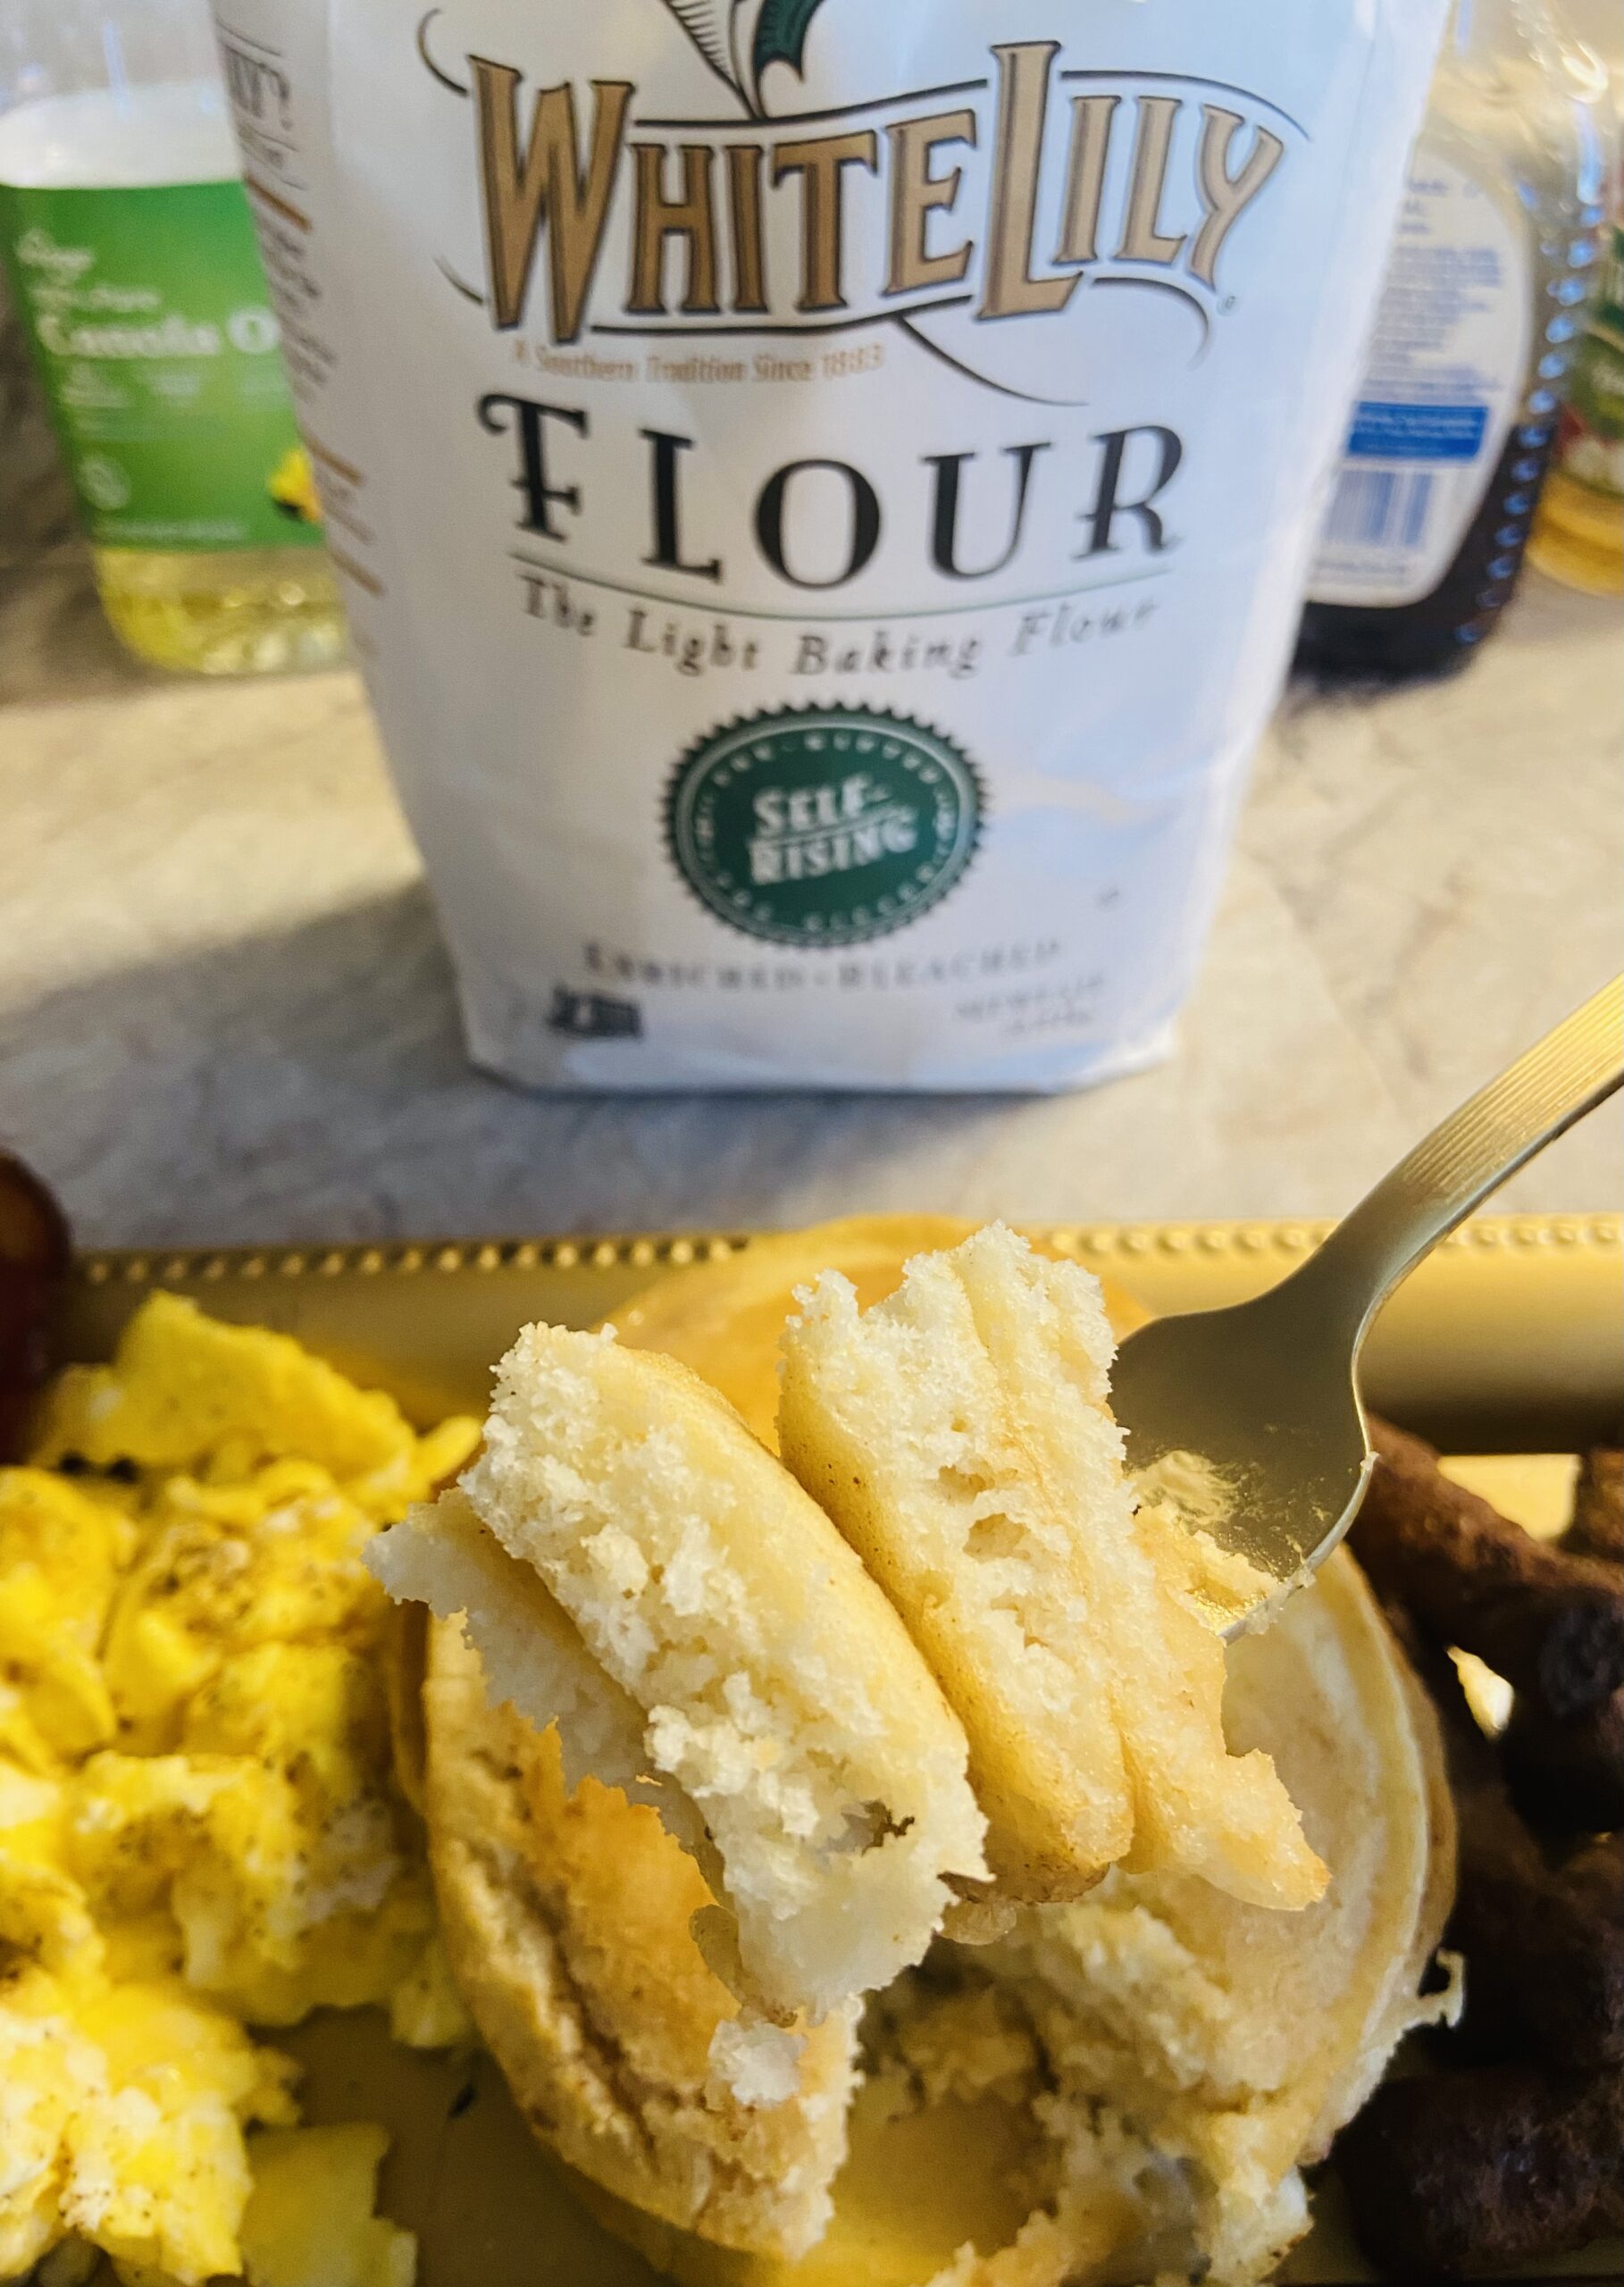
There’s nothing like waking up to the smell of pancakes sizzling on the stovetop. Around here, pancakes aren’t just breakfast—they’re comfort food, weekend traditions, and a little taste of home. When you use White Lily flour, you’re guaranteed pancakes that are soft, fluffy, and tender. This recipe is simple, quick, and made with ingredients you probably already have in your kitchen.
I grew up learning that the secret to the perfect pancake is the flour, and White Lily never disappoints. These pancakes cook up golden brown with buttery crisp edges and a pillowy center. Pair them with warm syrup, fresh berries, or a pat of butter melting on top, and you’ve got the perfect start to your morning.
Ingredients
- 1 ½ cups White Lily all-purpose flour
- 1 large egg
- 1 tsp vanilla extract
- 2 tbsp sugar
- 1 ¼ cups milk
- 3 tbsp melted butter (plus extra for serving)
- Crisco + butter (for frying)
Instructions
- Mix the batter: In a large bowl, whisk together the flour and sugar. In a separate bowl, beat the egg with the milk, vanilla, and melted butter. Slowly pour the wet ingredients into the dry, mixing until just combined. (Don’t overmix—your pancakes will stay fluffy this way.)
- Heat the skillet: Add a little Crisco and a small pat of butter to your skillet or griddle. Heat over medium until the butter is melted and bubbling. This blend gives the pancakes a beautiful golden color and crispy edges.
- Cook the pancakes: Pour about ¼ cup of batter onto the hot skillet for each pancake. Cook until bubbles form on the surface and the edges start to set, then flip and cook the other side until golden brown.
- Serve: Stack your pancakes high, drizzle with warm syrup, or add your favorite toppings like fresh fruit, whipped cream, or a dusting of powdered sugar.
Tips for the Best White Lily Pancakes
- Don’t press down on the pancakes while cooking—let them rise naturally.
- Use whole milk for richer flavor, but you can swap for 2% or even buttermilk for a tangy twist.
- Keep cooked pancakes warm in a 200°F oven until ready to serve.
Why White Lily Flour Makes a Difference
White Lily flour is milled from soft winter wheat, which has a lower protein content than most flours. That means it produces lighter, fluffier baked goods—perfect for pancakes, biscuits, and cakes. It’s the not-so-secret ingredient Southern kitchens have trusted for generations.
✨ Pin this recipe to your breakfast board so you can always find it when Saturday morning pancake cravings hit!
-
Easy Cinnamon Rolls with icing! The whole family will love!

If you love soft, fluffy cinnamon rolls but don’t want to wait overnight, this recipe is perfect for you! These easy cinnamon rolls with chilled dough are ready in just a few hours and topped with a sweet, creamy vanilla icing. They’re ideal for a cozy breakfast, brunch, or even dessert.
With a short chill in the fridge, the dough becomes easy to handle, rolls smoothly, and bakes into perfectly soft, gooey rolls that everyone will love.
Why You’ll Love This Recipe
- ✅ Quick and easy—no overnight chilling required
- ✅ Soft, buttery, and fluffy cinnamon rolls
- ✅ Sweet vanilla icing for the perfect finishing touch
- ✅ Perfect for family breakfasts, brunches, or special occasions
Ingredients
For the Dough
- 4 cups all-purpose flour
- 1 packet (2 1/4 tsp) active dry yeast
- 1/3 cup granulated sugar
- 1 tsp salt
- 1 cup whole milk, warmed (110°F / 43°C)
- 1/3 cup unsalted butter, melted
- 2 large eggs
For the Cinnamon Filling
- 1/2 cup unsalted butter, softened
- 1 cup brown sugar, packed
- 2 tbsp ground cinnamon
For the Vanilla Icing
- 1 cup powdered sugar
- 2–3 tbsp milk
- 1/2 tsp vanilla extract
Step-by-Step Instructions
Step 1: Make the Dough
- Dissolve yeast in warm milk with 1 tsp sugar. Let it sit 5–10 minutes until foamy.
- In a large bowl, combine flour, sugar, and salt.
- Add melted butter, eggs, and yeast mixture. Mix until a soft dough forms.
- Knead on a lightly floured surface 5–7 minutes until smooth.
- Place dough in a greased bowl, cover, and chill in the fridge 1–2 hours to make rolling easier.
Step 2: Roll and Fill
- Roll chilled dough into a rectangle about 12×16 inches.
- Spread softened butter evenly over dough.
- Mix brown sugar and cinnamon, then sprinkle evenly over the buttered dough.
Step 3: Shape the Rolls
- Roll dough tightly from the long edge into a log.
- Cut into 12 even rolls and place in a greased 9×13 pan.
- Cover and let rise at room temperature 30–45 minutes until puffy.
Step 4: Bake
- Preheat oven to 350°F (175°C).
- Bake rolls 25–30 minutes until golden brown.
Step 5: Make the Vanilla Icing
- Whisk powdered sugar, milk, and vanilla until smooth.
- Drizzle generously over warm cinnamon rolls.
Tips for Perfect Cinnamon Rolls
- Chill dough to make rolling and cutting easier without waiting overnight.
- Brush rolls lightly with butter before baking for extra soft, golden rolls.
- For gooier rolls, add a pinch of nutmeg or extra cinnamon to the filling.
- Serve slightly warm for the best gooey texture.
Storage
- Room Temperature: Keep covered in an airtight container for 1–2 days.
- Refrigerator: Store up to 4–5 days; warm slightly before serving.
- Freezer: Freeze baked rolls up to 2 months; thaw overnight in the fridge.
Final Thoughts
These easy chilled cinnamon rolls with vanilla icing are soft, buttery, and full of cinnamon-sugar goodness. The short chill makes rolling a breeze, and the sweet icing makes them irresistible. Perfect for weekends, holidays, or any time you want a cozy homemade treat!
-
Fluffy, Tender Angel Biscuits: A Easy Recipe for Baking Bliss

There’s a certain magic in baking, and nothing captures that magic quite like angel biscuits. These delightful treats are a hybrid of classic buttermilk biscuits and yeast rolls, giving you the best of both worlds: a tender crumb, a slight tang, and just the right amount of fluff. Whether you’re a seasoned baker or just starting your kitchen journey, this recipe is designed for simplicity and success.
What Are Angel Biscuits?
Angel biscuits are aptly named for their light, airy texture. They’re unique because they incorporate both leavening agents—baking soda and yeast—which combine to create their signature rise. Think of them as the ultimate crowd-pleaser: buttery, slightly sweet, and endlessly versatile.
Why Use Self-Rising Flour?
Using self-rising flour simplifies the process, saving you from measuring out additional ingredients like baking powder. It’s a shortcut that doesn’t compromise quality, making it an ideal choice for beginner and experienced bakers alike.
The Perfect Angel Biscuit Recipe
This scaled-down recipe makes about 8-10 biscuits, perfect for a cozy breakfast or dinner side. The steps are straightforward, and the ingredients are pantry staples, so you can whip these up anytime the craving strikes.
What You’ll Need:
- Self-rising flour: Ensures a consistent rise.
- Cold butter: Creates flaky layers as it melts during baking.
- Buttermilk: Adds richness and tang.
- Active dry yeast: Provides that characteristic pillowy texture.
Ingredients
- 2 1/4 cups (270g) self-rising flour
- 2 tablespoons (25g) granulated sugar
- 1/2 teaspoon baking soda
- 1 1/8 teaspoons (half a packet) active dry yeast
- 2 tablespoons (30ml) warm water (about 110°F/45°C)
- 1/4 cup (56.5g) cold unsalted butter, cubed
- 1 cup (240ml) buttermilk, cold
- 1 tablespoon melted butter (for brushing, optional)
Instructions
1. Activate the Yeast
In a small bowl, dissolve the yeast in warm water. Let it sit for 5-10 minutes until it becomes frothy. This step ensures the yeast is active.
2. Mix the Dry Ingredients
In a large mixing bowl, whisk together the self-rising flour, sugar, and baking soda.
3. Cut in the Butter
Add the cold, cubed butter to the dry ingredients. Use a pastry cutter or your fingertips to work the butter into the flour until the mixture resembles coarse crumbs. Work quickly to prevent the butter from melting.
4. Combine the Wet and Dry Ingredients
Add the frothy yeast mixture and cold buttermilk to the flour mixture. Stir gently until a sticky dough forms. Avoid overmixing to keep the biscuits tender. Add a little bit of flour at a time if dough is too sticky.
5. Chill the Dough (Optional but Recommended)
Cover the dough and refrigerate for at least 30 minutes, or up to overnight. This helps relax the gluten and makes the dough easier to handle.
6. Roll and Cut the Biscuits
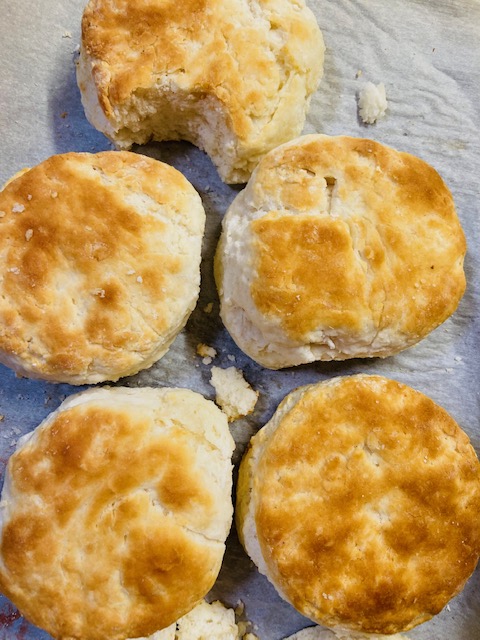
Preheat your oven to 400°F (200°C). Lightly flour a clean surface and roll out the dough to about 1/2-inch thickness. Use a biscuit cutter or a glass to cut out rounds. Re-roll scraps as needed.
7. Bake
Place the biscuits on a greased or parchment-lined baking sheet, leaving a little space between each. Bake for 12-15 minutes, or until the tops are golden brown.
8. Brush with Butter (Optional)
If desired, brush the hot biscuits with melted butter for extra flavor and shine.
Tips for Baking Success
- Work quickly: Keep the butter cold for those flaky layers.
- Don’t twist your cutter: Press straight down to help your biscuits rise evenly.
- Customize your biscuits: Brush with melted butter or sprinkle with herbs for an extra touch of flavor.
Why You’ll Love These Biscuits
Angel biscuits aren’t just bread—they’re a comforting addition to any table. Whether served warm with a drizzle of honey, as a sandwich base, or paired with savory dishes like fried chicken, they’re always a hit. Plus, they’re easy to make ahead, so you can enjoy fresh biscuits any day of the week.
Ready to try your hand at these heavenly biscuits? Grab your ingredients and let the baking begin!
-
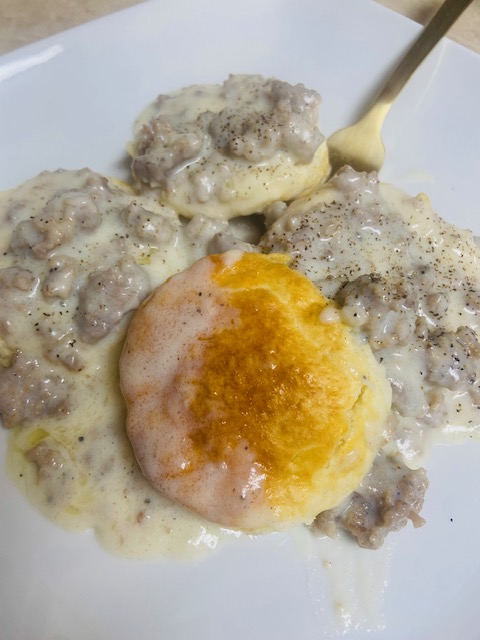
Easy Homemade Sausage Gravy Recipe

Sausage gravy is a comforting Southern classic that’s perfect for breakfast or brunch. Rich, creamy, and packed with savory flavor, this gravy pairs perfectly with flaky biscuits or even hash browns. Here’s an easy recipe to make delicious homemade sausage gravy using simple ingredients.
Ingredients:
- 1 1/2 lb homestyle breakfast sausage
- 1/4 cup all-purpose flour
- 3 cups whole milk (or more as needed)
- 1/2 teaspoon salt (adjust to taste)
- 1/2 teaspoon black pepper (freshly ground, if possible)
- Optional: a pinch of crushed red pepper flakes for a hint of heat
Instructions:
- Cook the Sausage: Heat a large skillet over medium heat. Add the sausage and cook, breaking it up with a spatula, until browned and fully cooked. This should take about 6-8 minutes. Do not drain the grease; it adds flavor to the gravy.
- Add the Flour: Sprinkle the flour evenly over the cooked sausage. Stir well to coat the sausage and absorb the grease. Cook for 1-2 minutes to remove the raw flour taste.
- Add the Milk: Gradually pour in the milk, stirring constantly to combine with the sausage and flour mixture. Continue to stir as the gravy starts to thicken. This will take about 5-7 minutes.
- Season the Gravy: Add salt, black pepper, and red pepper flakes (if using). Taste and adjust the seasoning as needed.
- Adjust Consistency: If the gravy is too thick, add a splash of milk and stir until you reach your desired consistency. If it’s too thin, let it simmer for a few more minutes to thicken.
- Serve: Remove the gravy from the heat and serve warm over freshly baked biscuits. Garnish with a sprinkle of black pepper if desired.
Tips for the Best Sausage Gravy:
- Quality Sausage: Use a good-quality breakfast sausage for the best flavor. Homestyle or seasoned varieties work particularly well.
- Don’t Skip the Grease: The rendered fat from the sausage is what makes the gravy rich and flavorful.
- Customize the Heat: Add cayenne pepper or hot sauce if you like a spicier gravy.
Serving Suggestions:
- Classic Pairing: Check out our easy 2-ingredient biscuits here: Serve over warm, flaky biscuits for a traditional breakfast.
- Creative Options: Use the gravy as a topping for hash browns, mashed potatoes, or even scrambled eggs.
- Make it a Meal: Pair with eggs, fresh fruit, and coffee for a hearty breakfast spread.
Homemade sausage gravy is a versatile dish that’s sure to become a family favorite. With just a handful of ingredients and a little time, you can whip up this comforting classic any day of the week. Let us know how you enjoyed this recipe in the comments below!
-
Homemade Granola Recipe: Easy, Delicious, and Customizable

Photo by Polina Tankilevitch on Pexels.com Granola is the perfect blend of crunchy, sweet, and wholesome goodness. Whether you’re looking for a quick breakfast, a healthy snack, or a topping for your favorite yogurt, homemade granola is an easy and cost-effective option. Plus, you can customize it to suit your taste preferences and dietary needs.
Here’s a simple recipe to make your own homemade granola:
Ingredients:
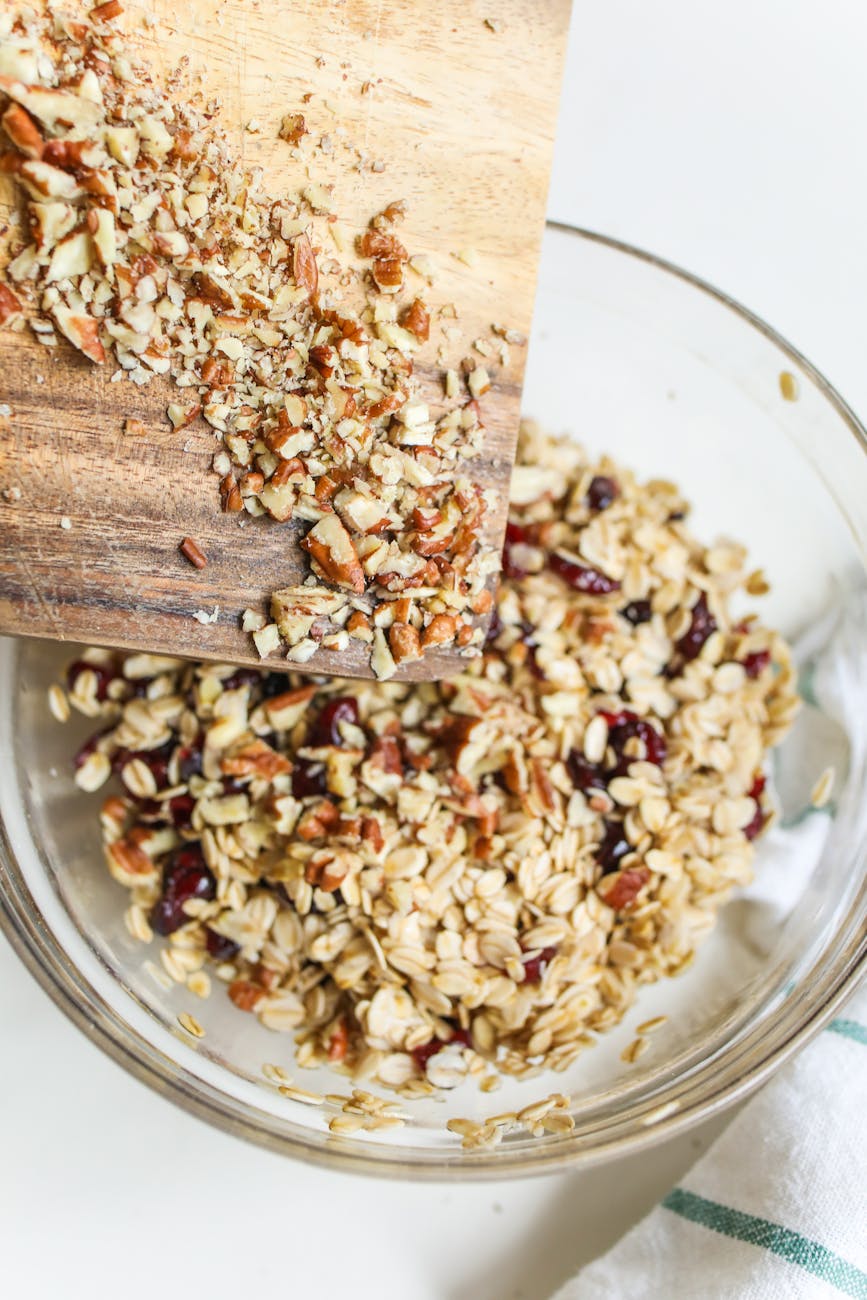
- 3 cups of rolled oats
- 1 cup of nuts (almonds, pecans, or walnuts work great)
- 1/2 cup of seeds (sunflower, pumpkin, or chia seeds)
- 1/2 cup of dried fruits (cranberries, raisins, or apricots)
- 1/3 cup of honey or maple syrup
- 1/3 cup of coconut oil or vegetable oil
- 1 teaspoon of vanilla extract
- 1/2 teaspoon of ground cinnamon
- 1/4 teaspoon of salt
Instructions:
- Preheat the Oven: Set your oven to 325°F (165°C) and line a baking sheet with parchment paper.
- Mix the Dry Ingredients: In a large mixing bowl, combine the oats, nuts, seeds, cinnamon, and salt. Stir until well mixed.
- Prepare the Wet Ingredients: In a small saucepan, warm the honey (or maple syrup), coconut oil, and vanilla extract over low heat until the mixture is smooth and combined. Remove from heat.
- Combine Wet and Dry Ingredients: Pour the warm honey mixture over the dry ingredients. Mix well to ensure everything is evenly coated.
- Spread on Baking Sheet: Evenly spread the granola mixture onto the prepared baking sheet. Press it down lightly for chunkier granola.
- Bake: Bake for 20-25 minutes, stirring halfway through for even toasting. Keep an eye on it to prevent burning.
- Cool and Add Dried Fruit: Remove the granola from the oven and let it cool completely. Once cooled, stir in the dried fruit.
- Store: Transfer your homemade granola to an airtight container. It will stay fresh for up to two weeks.
Tips for Customization:
- Sweetness: Adjust the sweetness to your liking by adding more or less honey/maple syrup.
- Add-Ins: Sprinkle in extras like shredded coconut, chocolate chips, or spices (like nutmeg) after baking.
- Texture: For extra clusters, don’t stir the granola while it’s cooling.
How to Enjoy Your Granola:
- As a topping for yogurt or smoothie bowls.
- Mixed with milk for a crunchy breakfast cereal.
- On its own as a grab-and-go snack.
Making homemade granola is incredibly rewarding. Not only is it healthier than many store-bought options, but it’s also a fun way to experiment with flavors and ingredients. Give it a try and share your favorite combinations in the comments below!
-
Easy Strawberry Pancakes Recipe: The Perfect Start to Your Day!

When it comes to breakfast, there’s something undeniably comforting about pancakes. Add strawberries to the mix, and you’ve got a sweet, tangy treat that’s perfect for a weekend morning. Using simple ingredients, this strawberry pancake recipe is both easy to follow and absolutely delicious. Whether you’re using fresh or frozen strawberries, the result is a fluffy, fruity pancake that’ll have everyone asking for seconds.
Ingredients:
- 1/2 cup self-rising flour
- 1 tablespoon avocado oil (or your preferred oil)
- 1 tablespoon melted butter
- 1/4 cup milk (use 2 tablespoons if using frozen strawberries; adjust for consistency)
- 1 egg
- 1/4 cup sugar
- 1 teaspoon vanilla extract
- 5 whole strawberries (fresh or frozen; thaw if frozen)
- Extra strawberries for garnish
Step-by-Step Instructions:
- Prepare the Strawberries
If using frozen strawberries, thaw them in the microwave until soft and juicy. Mash the strawberries with a fork or chop them into small pieces, reserving a few slices for garnish. If using fresh strawberries, dice them into small chunks. - Mix the Wet Ingredients
In a medium bowl, whisk together the egg, sugar, vanilla extract, avocado oil, and melted butter until smooth. Stir in the mashed or chopped strawberries. - Add the Dry Ingredients
Gradually mix the self-rising flour into the wet mixture, stirring until just combined. Be careful not to overmix to keep the batter light and fluffy. - Adjust the Consistency
Slowly add milk (or reduced milk if using frozen strawberries) until the batter reaches a pourable yet thick consistency. If the batter feels too thick, add a bit more milk, one teaspoon at a time. - Cook the Pancakes
Heat a non-stick skillet or griddle over medium heat. Lightly grease the surface with a small amount of butter or oil.Pour about 1/4 cup of batter onto the skillet for each pancake. Cook for 2-3 minutes, or until bubbles appear on the surface and the edges look set. Flip and cook for another 1-2 minutes until golden brown. - Serve and Enjoy
Stack the pancakes on a plate and garnish with the reserved strawberry slices. For an extra touch, drizzle with maple syrup, powdered sugar, or a dollop of whipped cream.
Tips for the Best Strawberry Pancakes:
- Use ripe strawberries: Whether fresh or frozen, make sure your strawberries are sweet and flavorful for the best results.
- Don’t overmix: Overmixing the batter can make the pancakes dense instead of fluffy.
- Adjust sweetness: If you prefer a less sweet pancake, reduce the sugar to 2 tablespoons.
- Add-ins: For an extra twist, toss in some mini chocolate chips or a sprinkle of cinnamon.
There you have it — a quick and easy recipe for strawberry pancakes that’s sure to brighten your morning. Pair these pancakes with your favorite coffee or tea, and enjoy the delightful combination of fluffy batter and juicy strawberries. Happy cooking!
-
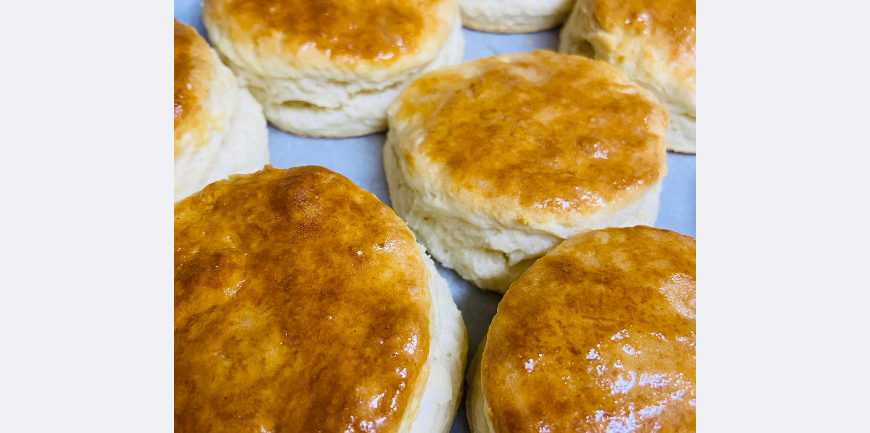
Easy 2-Ingredient Biscuits Recipe (Ready in 15 Minutes!)

Two-Ingredient Biscuits Recipe: Quick & Easy to Make
Prep Time: 5 minutes
Cook Time: 12-15 minutes
Servings: 8 biscuitsWhen you’re short on time but craving warm, flaky biscuits, this two-ingredient recipe is a lifesaver! Using just heavy cream and self-rising flour, you can whip up a batch of these tender biscuits in no time. For best results, White Lily self-rising flour is recommended due to its light texture and Southern charm.
Ingredients:
- 2 cups self-rising flour (preferably White Lily)
- 1 ½ cups heavy cream
Directions:
- Preheat Oven: Preheat your oven to 450°F (232°C). Line a baking sheet with parchment paper or lightly grease it.
- Mix Ingredients: In a large bowl, combine the self-rising flour and heavy cream. Stir gently until a dough forms. Be careful not to overmix.
- Shape Dough: Turn the dough out onto a lightly floured surface. Pat it into a 1-inch thick circle. Use a biscuit cutter or a glass to cut out biscuits. Gather scraps and repeat until all the dough is used.
- Bake: Place biscuits on the prepared baking sheet, slightly touching for softer edges or spaced apart for crispier edges. Bake in the preheated oven for 12-15 minutes, or until the tops are golden brown.
- Serve: Let the biscuits cool for a minute or two, then serve warm with butter, honey, or jam.
Tips:
- If you don’t have self-rising flour, you can make your own by mixing 2 cups of all-purpose flour with 1 tablespoon of baking powder and ½ teaspoon of salt.
- For extra golden tops, brush the biscuits with a little heavy cream before baking.
Enjoy the simplicity and deliciousness of these easy two-ingredient biscuits—perfect for breakfast, dinner, or as a snack!
