Your cart is currently empty!
Author: Kingdom Bakery
-
Papa John’s Pizza Dippers (Homemade & So Easy!)

If you love those cheesy, garlicky Papa John’s Pizza Dippers, you’re in for a treat! These homemade pizza dippers are soft, buttery, and full of flavor — perfect for dipping in warm marinara or garlic butter sauce.
With just a few pantry staples and some simple steps, you’ll have restaurant-style pizza dippers fresh out of your own oven.Let’s get into it — because once that garlic hits the oven, your kitchen will smell amazing.
Ingredients
- 180 ml warm water (about ¾ cup)
- 1 tablespoon olive oil (or melted butter)
- 1 teaspoon active dry yeast
- 1 teaspoon sugar (to activate the yeast)
- 1 ½ cups all-purpose flour (plus a little extra for kneading)
- ½ teaspoon salt
- Extra olive oil for brushing
- Garlic powder (to taste)
- Italian seasoning (to taste)
- Mozzarella cheese (shredded, as much as you like)
- Pepperoni slices (optional, but highly recommended!)
- Parsley (optional, for garnish)
- Marinara or garlic butter for dipping
Instructions
Step 1: Prepare the Dough
In a small bowl, mix together warm water, yeast, and sugar. Stir gently and let it rest for 5–10 minutes, until the surface becomes foamy — that means your yeast is alive and ready to work.
Step 2: Mix the Dough
In a large mixing bowl, combine the flour and salt. Make a small well in the center and pour in your yeast mixture and olive oil. Stir until everything begins to come together.
When it starts looking like dough, transfer it to a floured surface and knead for about 5–7 minutes until smooth and stretchy. Add a touch more flour if it feels sticky.
Step 3: Let it Rise
Shape your dough into a ball, place it in a lightly oiled bowl, and cover with a damp cloth or plastic wrap. Let it rest for 1 hour, or until it doubles in size.
(Pro tip: if your kitchen is cool, place it in a slightly warm oven — turned OFF — to help it rise faster!)
Step 4: Preheat the Oven
Set your oven to 350°F (175°C). Line a baking sheet with parchment paper or brush it with oil. You can also use a pizza stone for that classic crusty bottom.
Step 5: Shape Your Dippers
Once the dough has risen, punch it down to release air. Roll it out on a floured surface into a rectangle or circle — about ¼ inch thick.
For thinner, crispier dippers, roll it even thinner!
Step 6: Add the Flavor
Transfer the dough to your prepared pan.
Brush the top with olive oil (or pizza sauce if you prefer).
Sprinkle generously with garlic powder and Italian seasoning.Add a thick layer of mozzarella cheese and some pepperoni slices on top.
Step 7: Bake
Bake in your preheated oven for 10–15 minutes, or until the crust turns golden and the cheese is melted and bubbly.
If you like extra crispy edges, leave it in for 2–3 more minutes — just keep an eye on it!Step 8: Slice & Serve
Once out of the oven, let your pizza dippers cool for a couple of minutes.
Slice them into thick strips or bite-sized sticks, sprinkle with a little parsley for color, and serve with warm marinara or garlic butter sauce on the side.
Storage Tip
If you have leftovers (though that’s rare!), store them in an airtight container. Reheat in the oven or air fryer for a few minutes to bring back that soft, cheesy goodness.
Why You’ll Love These Pizza Dippers
🍕 Easy to make with pantry staples
🧄 Full of garlicky, buttery flavor
🧀 Stretchy, cheesy, and dip-worthy
❤️ Perfect for parties, game nights, or a cozy snack -
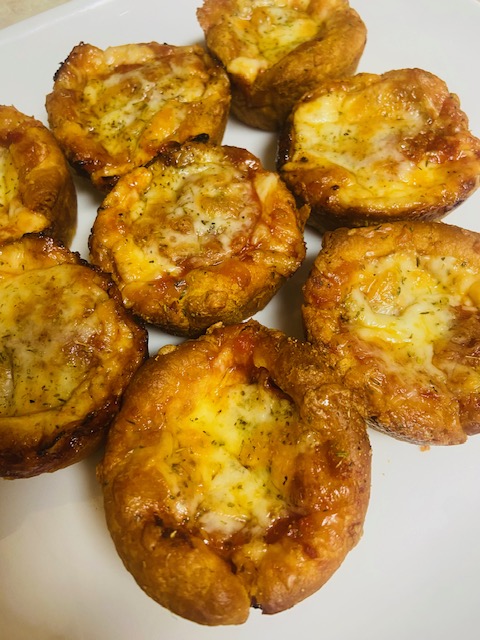
🍕 Little Caesars Crazy Puffs (Made in a Cupcake Pan!)

If you’ve ever had Little Caesars Crazy Puffs, you already know they’re one of those can’t-stop-eating snacks — soft dough, melty cheese, zesty pepperoni, and that buttery garlic flavor that hits just right. The only problem? They disappear fast and don’t come cheap!
So, I decided to make my own copycat Crazy Puffs right at home — using just a can of crescent dough, a few pantry staples, and my trusty cupcake tray. The result? Golden, cheesy, garlicky little pizza cups that taste just like the real deal (if not better). These are perfect for family movie nights, game days, or when that pizza craving hits but you don’t want to order out.
🧄 Ingredients You’ll Need:
- 1 package crescent dough
- Olive oil (for brushing)
- Italian seasoning, to taste
- Garlic powder, to taste
- Mozzarella or pizza blend cheese
- Pepperoni slices
Optional: Melted butter for brushing after baking (for that Crazy Bread-style finish!)
👩🏽🍳 How to Make Copycat Crazy Puffs:
- Preheat your oven to 375°F.
- Lightly grease a cupcake pan with olive oil or nonstick spray.
- Unroll your crescent dough and cut it into 8 even squares (press the seams together if needed).
- Press each dough square into a cupcake cup, shaping it like a little bowl — make sure some dough hangs over the edge so it can puff up beautifully.
- First layer: Add a small spoonful of shredded cheese and one slice of pepperoni to the bottom.
- Second layer: Add another sprinkle of cheese and another slice of pepperoni right on top — because one layer just isn’t enough! 😋
- Brush the tops lightly with olive oil and sprinkle with garlic powder and Italian seasoning.
- Bake for 12–15 minutes, or until golden brown, bubbly, and slightly crisp on the edges.
- Optional finishing touch: Brush with melted butter and a pinch more garlic powder and Italian seasoning right after baking for that signature Crazy Bread flavor.
🍽️ Serving Ideas:
Serve your puffs warm with a side of marinara sauce, pizza sauce, or even ranch dressing for dipping. These are perfect for:
- After-school snacks 🍴
- Game night appetizers 🏈
- Party trays or potlucks 🎉
- A fun pizza-night twist for the family 🍕
💡 Tips for Perfect Crazy Puffs:
- Use a cupcake pan — it helps the dough puff up and hold all that cheesy filling.
- Don’t skip the butter at the end! It makes them taste exactly like Little Caesars’ buttery, garlicky goodness.
- Try different toppings — sausage, cooked bacon, or even diced veggies work great too.
- Serve hot and fresh — they taste best right out of the oven when the cheese is still melty and gooey.
❤️ Why You’ll Love These:
- Made with simple grocery store ingredients
- No pizza dough kneading required
- Ready in about 20 minutes
- Family and kid-approved
- Perfect Little Caesars dupe — but even fresher!
📌 Save this recipe to your Easy Snacks, Copycat Recipes, or Family Favorites board — because once you make these, you’ll never look at regular pizza the same again!
-
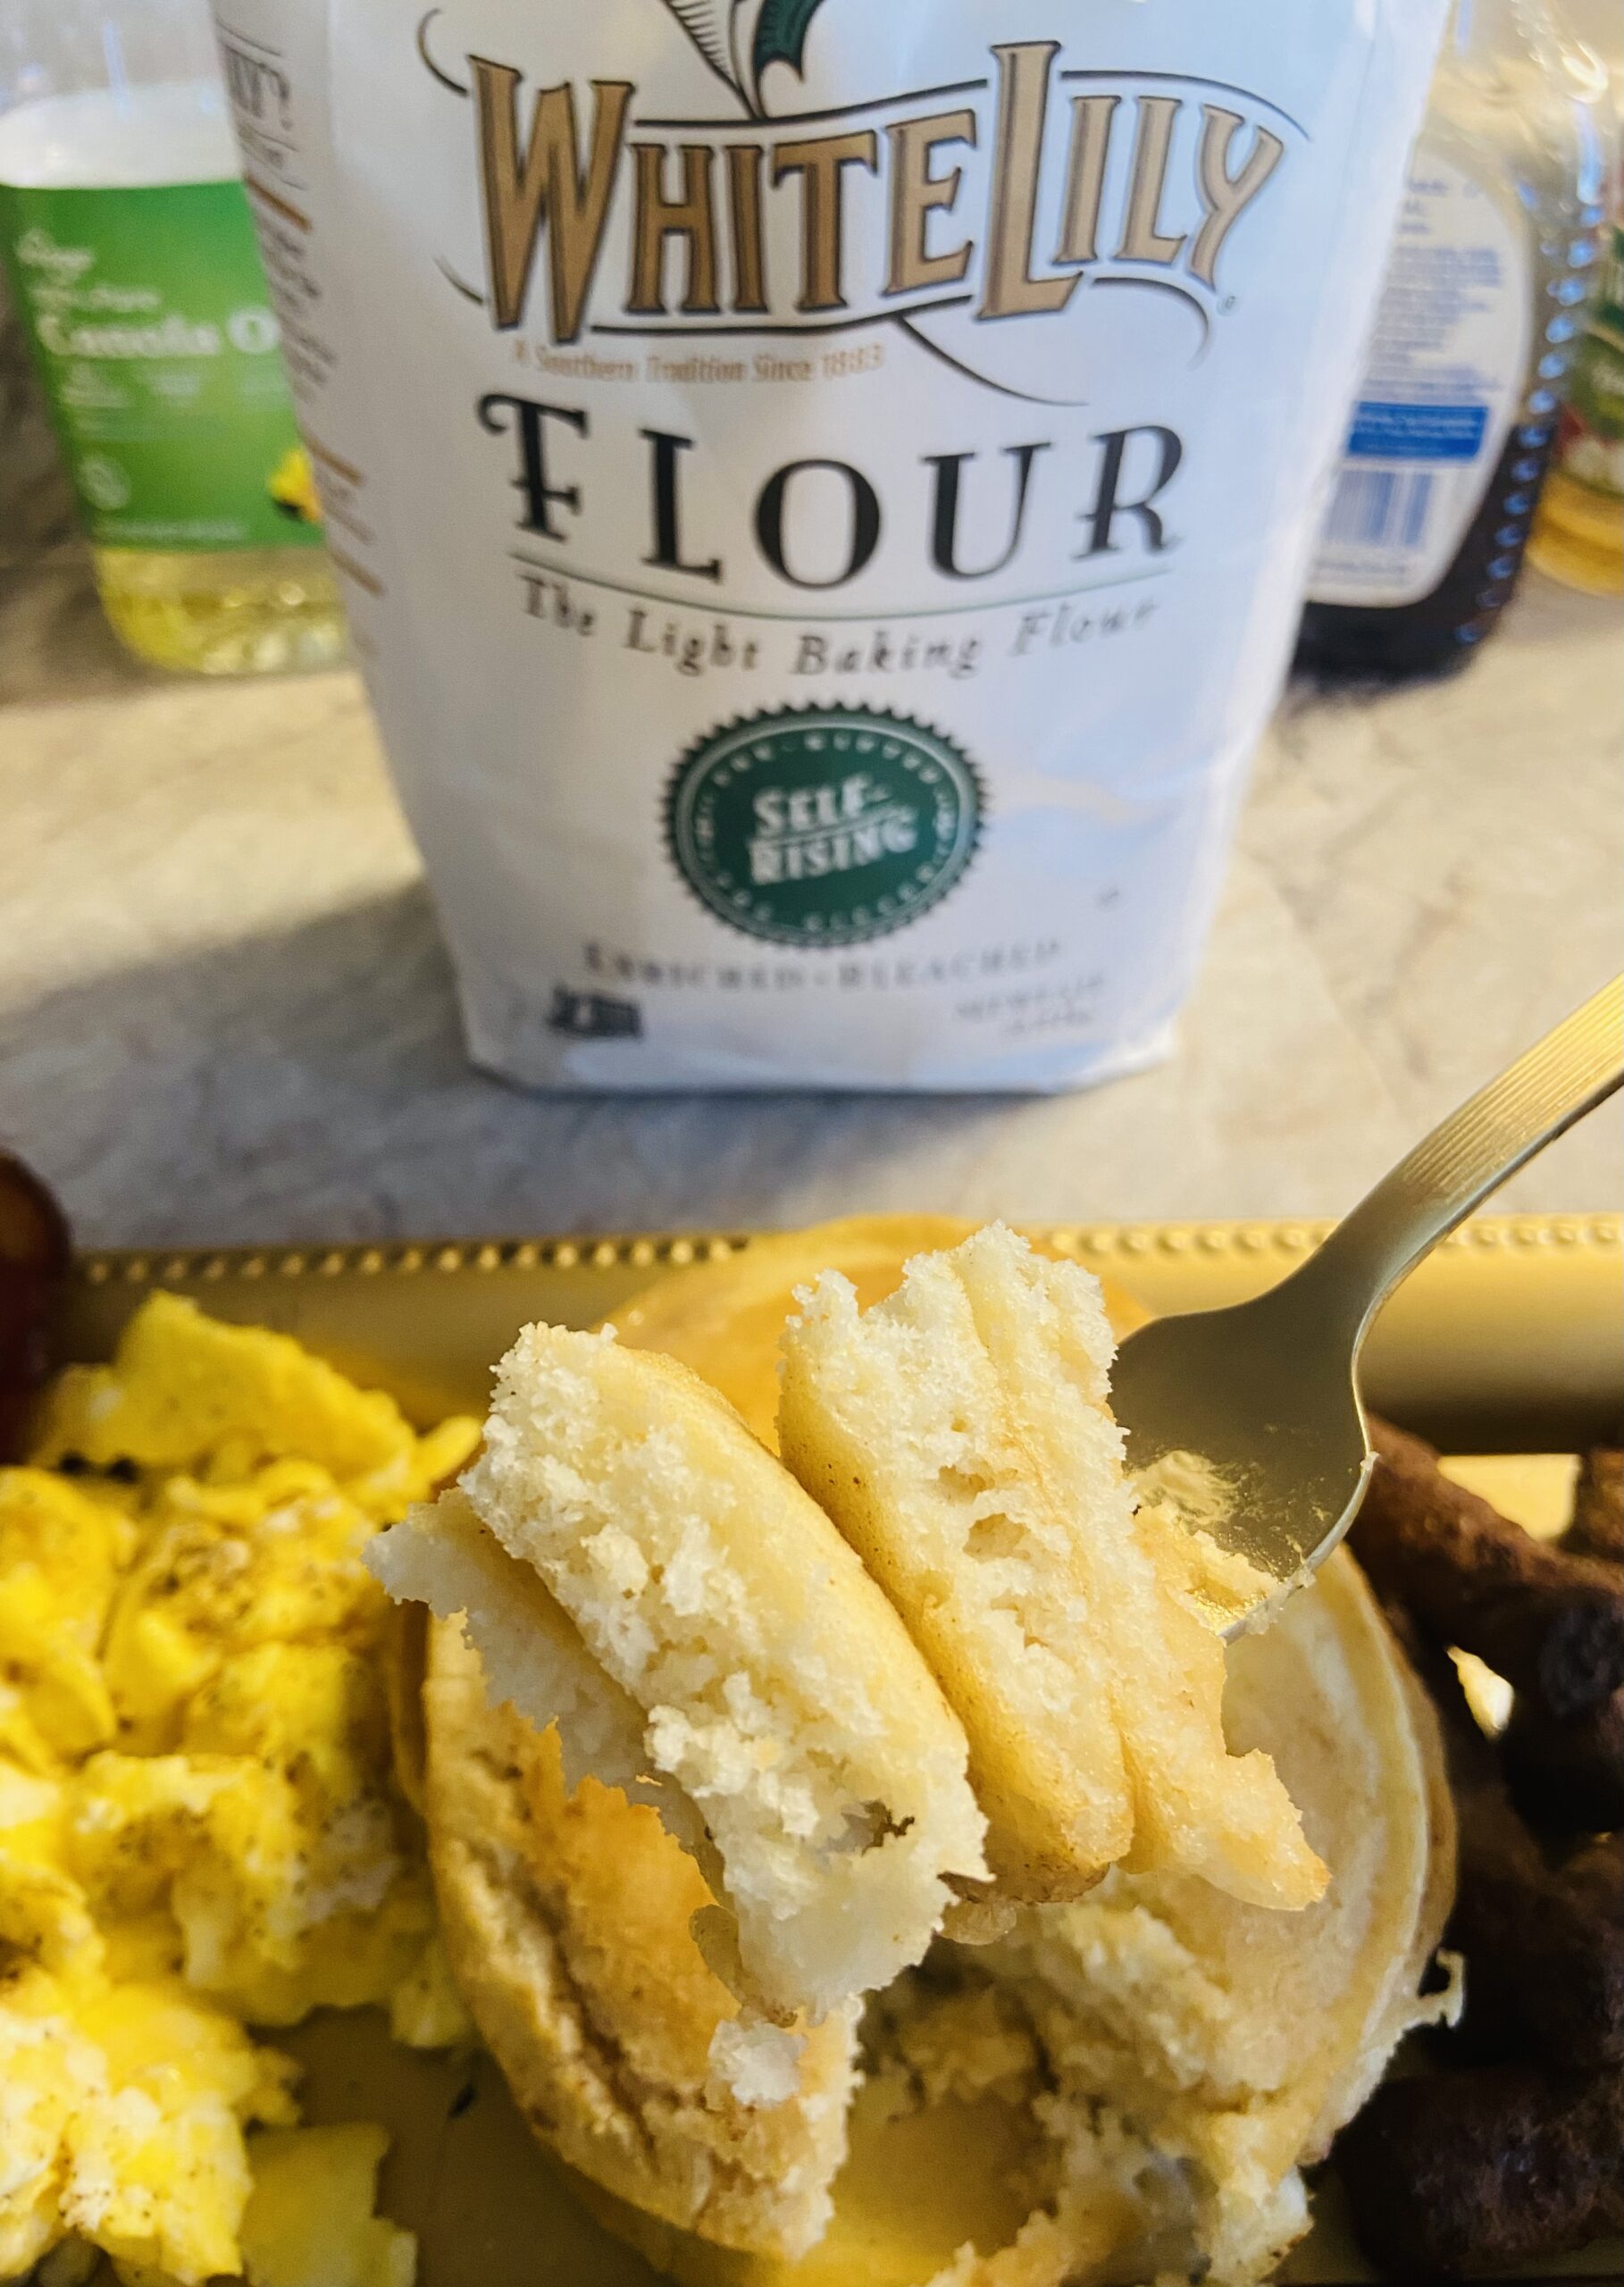
Easy Fluffy White Lily Pancakes Recipe (Kid approved)

There’s nothing like waking up to the smell of pancakes sizzling on the stovetop. Around here, pancakes aren’t just breakfast—they’re comfort food, weekend traditions, and a little taste of home. When you use White Lily flour, you’re guaranteed pancakes that are soft, fluffy, and tender. This recipe is simple, quick, and made with ingredients you probably already have in your kitchen.
I grew up learning that the secret to the perfect pancake is the flour, and White Lily never disappoints. These pancakes cook up golden brown with buttery crisp edges and a pillowy center. Pair them with warm syrup, fresh berries, or a pat of butter melting on top, and you’ve got the perfect start to your morning.
Ingredients
- 1 ½ cups White Lily all-purpose flour
- 1 large egg
- 1 tsp vanilla extract
- 2 tbsp sugar
- 1 ¼ cups milk
- 3 tbsp melted butter (plus extra for serving)
- Crisco + butter (for frying)
Instructions
- Mix the batter: In a large bowl, whisk together the flour and sugar. In a separate bowl, beat the egg with the milk, vanilla, and melted butter. Slowly pour the wet ingredients into the dry, mixing until just combined. (Don’t overmix—your pancakes will stay fluffy this way.)
- Heat the skillet: Add a little Crisco and a small pat of butter to your skillet or griddle. Heat over medium until the butter is melted and bubbling. This blend gives the pancakes a beautiful golden color and crispy edges.
- Cook the pancakes: Pour about ¼ cup of batter onto the hot skillet for each pancake. Cook until bubbles form on the surface and the edges start to set, then flip and cook the other side until golden brown.
- Serve: Stack your pancakes high, drizzle with warm syrup, or add your favorite toppings like fresh fruit, whipped cream, or a dusting of powdered sugar.
Tips for the Best White Lily Pancakes
- Don’t press down on the pancakes while cooking—let them rise naturally.
- Use whole milk for richer flavor, but you can swap for 2% or even buttermilk for a tangy twist.
- Keep cooked pancakes warm in a 200°F oven until ready to serve.
Why White Lily Flour Makes a Difference
White Lily flour is milled from soft winter wheat, which has a lower protein content than most flours. That means it produces lighter, fluffier baked goods—perfect for pancakes, biscuits, and cakes. It’s the not-so-secret ingredient Southern kitchens have trusted for generations.
✨ Pin this recipe to your breakfast board so you can always find it when Saturday morning pancake cravings hit!
-
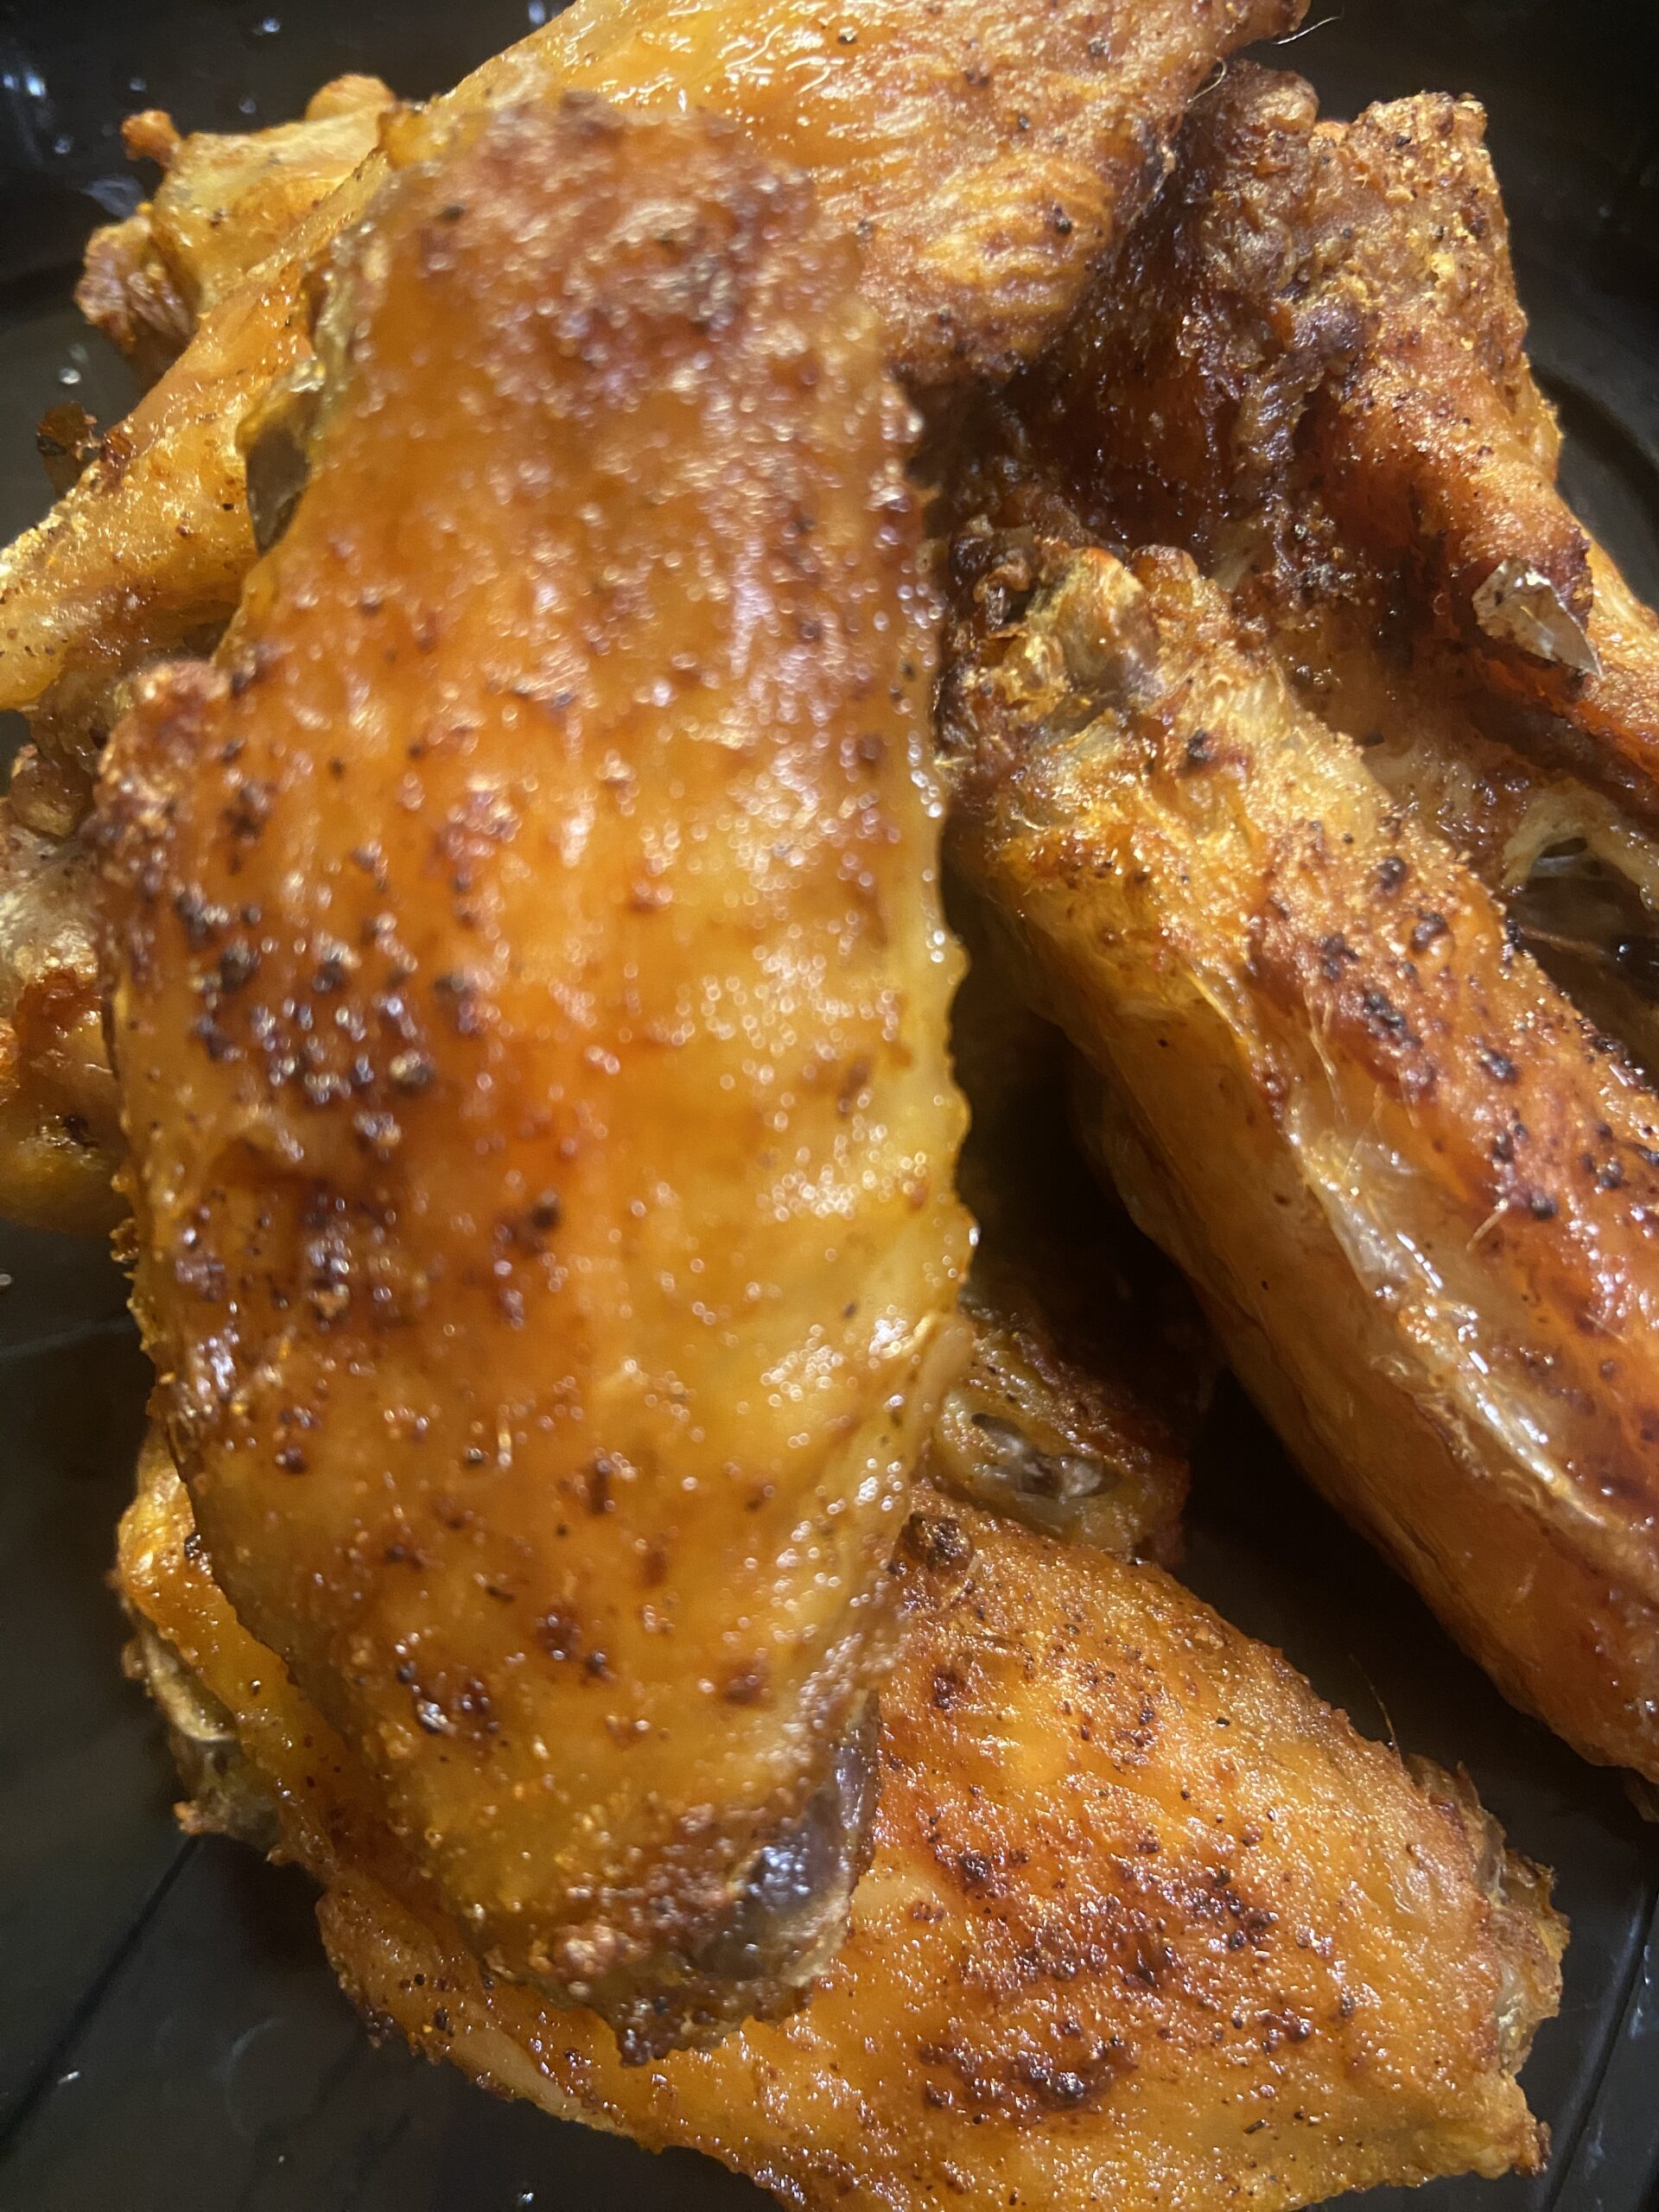
Quick & Crispy Air Fryer Chicken Wings You’ll Make Every Week

When you want wings that are bold, flavorful, and perfectly crispy without deep-frying, the air fryer is your best friend. These Mustard & Creole Air Fryer Wings have the perfect mix of tangy mustard, Tony’s Creole seasoning, garlic, and onion powder—all tied together with a light cornstarch coating for that irresistible crunch.
Whether you’re making them for game day, a quick weeknight dinner, or a snack platter, these wings are guaranteed to disappear fast!
Why You’ll Love These Wings
- Crispy without deep frying – The air fryer gives them golden crunch with less oil.
- Flavor-packed – Mustard brings tang, while Creole seasoning adds that signature kick.
- Quick & easy – From prep to plate in under 30 minutes.
- Versatile – Eat them dry, or toss them in your favorite wing sauce.
Ingredients You’ll Need
- 2 lbs chicken wings (flats and drums, separated)
- 2 tbsp yellow mustard (Dijon works if you like more tang)
- 1 ½ tbsp cornstarch (for crunch)
- 1 tbsp oil (vegetable, canola, or olive)
- 1 tbsp Tony’s Creole seasoning (adjust to taste)
- 1 tsp garlic powder
- 1 tsp onion powder
Step-by-Step Instructions
1. Prep the Wings
Pat your chicken wings really dry with paper towels—this step is key to getting crispy skin.
2. Coat & Season
In a large bowl, toss the wings with mustard and oil until evenly coated.
Sprinkle on cornstarch, Creole seasoning, garlic, and onion powder. Toss again until every wing is coated.3. Preheat the Air Fryer
Set your air fryer to 390°F for 3–5 minutes.
4. Cook the Wings
Arrange the wings in a single layer (work in batches if needed).
Air fry for 18–22 minutes, flipping halfway through. For extra crispiness, bump the temp up to 400°F for the last 3–4 minutes.5. Serve & Enjoy
Enjoy hot as they are, or toss in extra sauce—buffalo, honey mustard, or even BBQ all work great with this base seasoning.
Tips for the Crispiest Air Fryer Wings
- Don’t skip drying the wings before seasoning.
- Cook in a single layer—crowding = soggy wings.
- Want more heat? Add cayenne or hot sauce to the mustard mix.
- Like saucy wings? Toss them after air frying to keep the skin crisp.
- Cook longer if you like them extra crunchy—air fryers vary, so test your perfect level of crisp!
What to Serve With These Wings
Pair with:
- Ranch or blue cheese dip
- Celery & carrot sticks
- Cornbread muffins or your favorite Southern sides
-
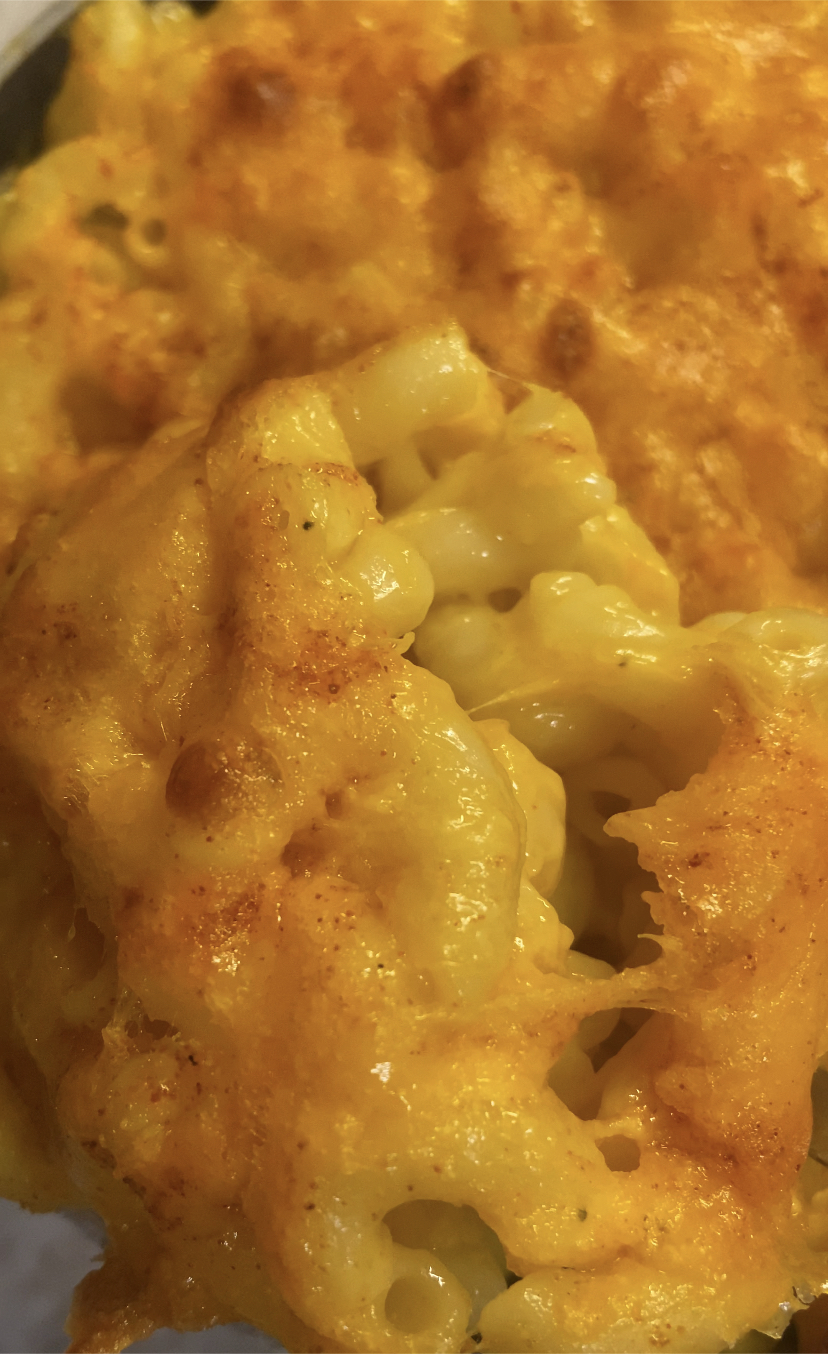
Easy One-Cheese Baked Macaroni (Weeknight, Kid & Adult Approved!)

When it comes to comfort food, nothing beats a bubbling dish of baked macaroni and cheese. But sometimes you just need something simple—no fuss, no long list of ingredients, just real cheesy goodness. That’s where this Super Easy One-Cheese Baked Macaroni comes in.
With just a box of pasta, a bag of sharp cheddar, and a few pantry staples, you can have a family-friendly dinner that feels special without taking all night. The stovetop prep is quick, and finishing it off in the oven gives you that golden, cheesy topping everyone loves.
Kids will devour it, adults will sneak seconds, and you’ll appreciate how fast and budget-friendly it is.
Recipe: Super Easy One-Cheese Baked Macaroni
Servings: 4–6
Time: 35 minutesIngredients:
- 1 (16 oz) box elbow macaroni (or any short pasta)
- 2 ½ cups shredded sharp cheddar cheese (divided)
- ½ stick (4 tbsp) unsalted butter
- Salt (for pasta water + seasoning)
- ½ tsp black pepper (or to taste)
- ½ tsp paprika (optional, for flavor and color)
Instructions:
- Cook the pasta
- Bring a large pot of salted water to a boil.
- Add macaroni and cook according to package directions until al dente.
- Drain and transfer pasta to a large mixing bowl.
- Mix the base
- While pasta is still warm, add butter and stir until melted.
- Add about 2 cups of shredded sharp cheddar cheese, mixing until melted and creamy.
- Season with salt, black pepper, and paprika to taste.
- Assemble for baking
- Pour the cheesy pasta mixture into a lightly greased baking dish.
- Top evenly with the remaining ½ cup shredded cheddar cheese.
- Bake
- Place in a preheated oven at 375°F (190°C) for about 15–20 minutes, or until the top is melted, bubbly, and slightly golden.
- Serve
- Spoon into bowls or onto plates and enjoy hot!
Tips & Tricks:
- For extra creaminess, mix in a splash of milk with the cheese.
- Want a little crunch? Sprinkle breadcrumbs mixed with melted butter on top before baking.
- Leftovers reheat best in the oven with a touch of extra cheese.
This baked version takes your one-cheese macaroni up a notch—crispy on top, gooey in the middle, and still super easy. Perfect for busy weeknights, family dinners, or when you just want cozy comfort food without the effort.
-
Easy Pepperoni Mozzarella Lasagna (Pizza-Inspired!)

Lasagna is one of those comfort meals that feels like a hug on a plate—but sometimes you just want a simpler, quicker version without losing that cheesy, saucy goodness. That’s where this Easy Pepperoni Mozzarella Lasagna comes in. Made with Kroger brand lasagna noodles, Ragu chunky pasta sauce, layers of mozzarella cheese, and plenty of pepperoni, this dish is a fun, pizza-inspired twist that the whole family will love.
The best part? It comes together in one 9×11 pan and bakes up bubbly, golden, and irresistible.
Ingredients
- 1 box Kroger brand lasagna noodles (regular, not oven-ready)
- 1 jar (about 24 oz) Ragu chunky pasta sauce
- 2 cups mozzarella cheese, shredded (add more if you love it extra cheesy!)
- 1 package pepperoni slices
- 1–2 tablespoons olive oil (for noodles, optional)
- Salt for boiling water
Instructions
- Cook the noodles
- Bring a large pot of salted water to a boil. Cook Kroger lasagna noodles according to package directions until al dente. Drain and drizzle lightly with olive oil to prevent sticking.
- Layer the lasagna
- Preheat oven to 375°F.
- Spread a thin layer of Ragu chunky sauce on the bottom of a 9×11 baking dish.
- Add a single layer of noodles.
- Spread more sauce over the noodles, sprinkle with mozzarella, and add a layer of pepperoni slices.
- Repeat the layers (noodles → sauce → cheese → pepperoni) until all ingredients are used. Finish with a generous layer of mozzarella and pepperoni on top.
- Bake
- Cover loosely with foil and bake for 25 minutes.
- Remove foil and bake an additional 10–15 minutes, until cheese is melted, bubbly, and lightly golden.
- Serve
- Let lasagna rest for 10 minutes before slicing. This helps it set up and makes serving easier.
Tips & Variations
- Add extra mozzarella between the layers if you’re a cheese-lover.
- Sprinkle a little Italian seasoning or red pepper flakes for extra flavor.
- Pair with garlic bread and a simple salad for a full dinner spread.
Why You’ll Love This Recipe:
This pepperoni mozzarella lasagna is basically pizza and pasta combined into one dish. It’s easy to make with pantry staples, budget-friendly, and guaranteed to bring smiles to the dinner table.
Serving Size: About 6–8 servings
Prep Time: 20 minutes
Cook Time: 40 minutes
Total Time: 1 hour
Final Bite
Whether it’s a weeknight dinner or a weekend family gathering, this Easy Pepperoni Mozzarella Lasagna is bound to be a hit. It’s hearty, cheesy, and simple to whip up with just a few ingredients—making it the perfect recipe to keep in your rotation.
-
Easy Cinnamon Rolls with icing! The whole family will love!

If you love soft, fluffy cinnamon rolls but don’t want to wait overnight, this recipe is perfect for you! These easy cinnamon rolls with chilled dough are ready in just a few hours and topped with a sweet, creamy vanilla icing. They’re ideal for a cozy breakfast, brunch, or even dessert.
With a short chill in the fridge, the dough becomes easy to handle, rolls smoothly, and bakes into perfectly soft, gooey rolls that everyone will love.
Why You’ll Love This Recipe
- ✅ Quick and easy—no overnight chilling required
- ✅ Soft, buttery, and fluffy cinnamon rolls
- ✅ Sweet vanilla icing for the perfect finishing touch
- ✅ Perfect for family breakfasts, brunches, or special occasions
Ingredients
For the Dough
- 4 cups all-purpose flour
- 1 packet (2 1/4 tsp) active dry yeast
- 1/3 cup granulated sugar
- 1 tsp salt
- 1 cup whole milk, warmed (110°F / 43°C)
- 1/3 cup unsalted butter, melted
- 2 large eggs
For the Cinnamon Filling
- 1/2 cup unsalted butter, softened
- 1 cup brown sugar, packed
- 2 tbsp ground cinnamon
For the Vanilla Icing
- 1 cup powdered sugar
- 2–3 tbsp milk
- 1/2 tsp vanilla extract
Step-by-Step Instructions
Step 1: Make the Dough
- Dissolve yeast in warm milk with 1 tsp sugar. Let it sit 5–10 minutes until foamy.
- In a large bowl, combine flour, sugar, and salt.
- Add melted butter, eggs, and yeast mixture. Mix until a soft dough forms.
- Knead on a lightly floured surface 5–7 minutes until smooth.
- Place dough in a greased bowl, cover, and chill in the fridge 1–2 hours to make rolling easier.
Step 2: Roll and Fill
- Roll chilled dough into a rectangle about 12×16 inches.
- Spread softened butter evenly over dough.
- Mix brown sugar and cinnamon, then sprinkle evenly over the buttered dough.
Step 3: Shape the Rolls
- Roll dough tightly from the long edge into a log.
- Cut into 12 even rolls and place in a greased 9×13 pan.
- Cover and let rise at room temperature 30–45 minutes until puffy.
Step 4: Bake
- Preheat oven to 350°F (175°C).
- Bake rolls 25–30 minutes until golden brown.
Step 5: Make the Vanilla Icing
- Whisk powdered sugar, milk, and vanilla until smooth.
- Drizzle generously over warm cinnamon rolls.
Tips for Perfect Cinnamon Rolls
- Chill dough to make rolling and cutting easier without waiting overnight.
- Brush rolls lightly with butter before baking for extra soft, golden rolls.
- For gooier rolls, add a pinch of nutmeg or extra cinnamon to the filling.
- Serve slightly warm for the best gooey texture.
Storage
- Room Temperature: Keep covered in an airtight container for 1–2 days.
- Refrigerator: Store up to 4–5 days; warm slightly before serving.
- Freezer: Freeze baked rolls up to 2 months; thaw overnight in the fridge.
Final Thoughts
These easy chilled cinnamon rolls with vanilla icing are soft, buttery, and full of cinnamon-sugar goodness. The short chill makes rolling a breeze, and the sweet icing makes them irresistible. Perfect for weekends, holidays, or any time you want a cozy homemade treat!
-
Classic Yellow Pound Cake with Chocolate Ganache and Sprinkles

🍩 Classic Yellow Pound Cake with Chocolate Ganache & Sprinkles (Donut-Inspired Cake)
If you’ve ever wished your favorite chocolate sprinkle donut came in cake form, this recipe is for you! This classic yellow cake pound cake is moist, buttery, and rich—topped with silky smooth chocolate ganache and a shower of colorful sprinkles. It looks just like a giant chocolate donut but tastes like a decadent homemade cake.
Perfect for birthdays, parties, or anytime you want to bake something whimsical yet classic, this recipe brings together the best of both worlds: the comfort of pound cake and the fun of a sprinkle donut.
Why You’ll Love This Cake
- ✅ Moist, buttery yellow pound cake base
- ✅ Easy, velvety chocolate ganache frosting
- ✅ Fun “donut” look with sprinkles
- ✅ Crowd-pleasing flavor combo everyone loves
- ✅ Perfect centerpiece dessert for any occasion
🍩 Yellow Pound Cake with Whipped Chocolate Ganache & Sprinkles
A classic yellow pound cake topped with airy, whipped chocolate ganache and rainbow sprinkles—looks like a giant chocolate sprinkle donut but tastes like a rich, decadent cake.
Ingredients
Yellow Pound Cake
- 1 cup (2 sticks) unsalted butter, softened
- 2 cups granulated sugar
- 4 large eggs, room temperature
- 2 tsp vanilla extract
- 3 cups all-purpose flour
- 2 tsp baking powder
- 1/2 tsp salt
- 1 cup whole milk or buttermilk
Whipped Chocolate Ganache
- 8 oz semi-sweet chocolate, chopped
- 3/4 cup heavy cream
- 1 tbsp unsalted butter
- 1 tsp vanilla extract
Topping
- Rainbow sprinkles
Instructions
Step 1: Bake the Pound Cake
- Preheat oven to 350°F (175°C). Grease a bundt pan or loaf pan.
- Cream butter and sugar until fluffy (3–4 minutes).
- Beat in eggs one at a time, then stir in vanilla.
- Whisk flour, baking powder, and salt in a separate bowl.
- Alternate adding dry ingredients and milk to butter mixture. Mix until just combined.
- Pour into prepared pan and bake 50–60 minutes (toothpick comes out clean).
- Cool in pan 10 minutes, then invert onto a wire rack. Cool completely.
Step 2: Make Whipped Ganache
- Heat cream in a small saucepan until just simmering. Pour over chopped chocolate in a heatproof bowl. Let sit 2 minutes.
- Stir until smooth, then add butter and vanilla.
- Chill the ganache in the fridge 30–45 minutes until thickened.
- Use a hand mixer or stand mixer to whip the ganache until light and fluffy.
Step 3: Frost & Decorate
- Spread or pipe whipped ganache over cooled pound cake.
- Sprinkle generously with rainbow sprinkles.
Tips for Success
- 🍋 Add 1 tsp almond extract for a bakery-style twist in the cake.
- ❄️ Make the cake a day ahead—flavors develop beautifully overnight.
- 🍩 Use a bundt pan for the full donut effect, but a loaf pan works too.
- 🌈 Don’t skimp on sprinkles—pile them on for the most fun look!
How to Store
- Room Temp: Covered, up to 2 days.
- Refrigerator: Keeps 5 days (bring to room temp before serving).
- Freezer: Wrap slices and freeze up to 2 months. Thaw and enjoy!
🎉 Final Thoughts
This Yellow Pound Cake with Chocolate Ganache and Sprinkles is a playful twist on two classics: pound cake and chocolate sprinkle donuts. It’s buttery, rich, and topped with a shiny chocolate glaze that makes it look just like a giant donut. Perfect for birthdays, parties, or whenever you want to bake something fun yet timeless.ps
- Chill ganache just enough to whip; if it’s too soft, it won’t hold peaks.
- Use a bundt pan for the “donut” look or a loaf pan for slices.
- Add 1 tsp almond or coffee extract to ganache for a flavor twist.
-
Easy Apple Pie Bars with Buttery Shortbread Crust youll love these!

If you love apple pie but don’t always feel like making a whole pie, these Apple Pie Bars with a buttery shortbread crust are the perfect solution. They’re easy to slice, share, and serve—making them a go-to dessert for family gatherings, holidays, or just when you’re craving a cozy fall treat. Imagine tender cinnamon apples layered between a rich, melt-in-your-mouth crust and a sweet crumb topping… absolute heaven in bar form!
Why You’ll Love These Apple Pie Bars
- ✅ Easier than making a traditional apple pie
- ✅ Buttery shortbread crust that melts in your mouth
- ✅ Sweet cinnamon apple filling
- ✅ Melted-butter crumble topping for big, crunchy clusters
- ✅ Perfect for fall baking, holidays, or bake sales
Ingredients You’ll Need
For the Crust:
- 1 cup (2 sticks) unsalted butter, softened
- 2/3 cup sugar
- 1/2 tsp vanilla extract
- 2 1/4 cups all-purpose flour
- 1/4 tsp salt
For the Apple Filling:
- 4 cups apples (about 4 medium, Granny Smith or Honeycrisp), peeled and thinly sliced
- 2 tbsp lemon juice
- 1/2 cup brown sugar, packed
- 1 tsp cinnamon
- 1/4 tsp nutmeg
- 2 tsp cornstarch
For the Melted Butter Crumble:
- 1 cup all-purpose flour
- 1/2 cup brown sugar, packed
- 1/4 cup granulated sugar
- 1 tsp cinnamon
- 1/2 cup unsalted butter, melted
Optional Glaze:
- 1/2 cup powdered sugar
- 1–2 tbsp milk or cream
- 1/4 tsp vanilla extract
Step-by-Step Instructions
Step 1: Make the Crust
Preheat your oven to 350°F (175°C). Line a 9×13-inch baking pan with parchment paper for easy removal.
Cream butter and sugar until fluffy, then mix in vanilla, flour, and salt until dough forms. Press evenly into the pan and bake for 12–15 minutes, just until the edges turn golden.Step 2: Prepare the Apple Filling
Toss thinly sliced apples with lemon juice. Mix in brown sugar, cinnamon, nutmeg, and cornstarch until apples are evenly coated.
Step 3: Make the Crumble
In a bowl, whisk together flour, brown sugar, granulated sugar, and cinnamon. Stir in the melted butter until the mixture forms clumps.
Step 4: Assemble and Bake
Spread the apple filling evenly over the baked crust. Sprinkle the crumble topping generously over the apples. Bake for 35–40 minutes, until the topping is golden and the apples are bubbling.
Step 5: Cool and Drizzle
Let bars cool completely in the pan so they set. Once cooled, whisk powdered sugar, milk, and vanilla together for a simple glaze and drizzle over the top before slicing.
Recipe Tips
- 🍎 Use tart apples (like Granny Smith) for the best sweet-tangy balance.
- ❄️ Chill before cutting for clean, bakery-style slices.
- 🍨 Serve warm with vanilla ice cream for a pie à la mode twist.
- 🎃 Swap apples for pears or add a handful of chopped pecans to the crumble for variety.
Storing Your Apple Pie Bars
- Room Temp: Store in an airtight container for up to 2 days.
- Refrigerator: Keeps well for up to 5 days.
- Freezer: Wrap bars individually and freeze up to 2 months. Thaw overnight before serving.
🍏 Final Thoughts
These Apple Pie Bars with Buttery Shortbread Crust give you all the comfort of apple pie in a fuss-free, shareable dessert. They’re sweet, buttery, and bursting with cinnamon-spiced apples—perfect for fall baking or anytime you want a cozy treat without rolling out pie dough.
-

Easy Strawberry Cheesecake bites: A Perfect Valentine’s Day Dessert!

Valentine’s Day is the perfect occasion to indulge in something sweet and share a little love. If you’re looking for a dessert that’s easy to make, visually stunning, and absolutely delicious, these Heart-Shaped Chocolate-Covered Strawberry Cheesecake Bites are the answer! They’re the perfect blend of creamy cheesecake, fresh strawberries, and rich chocolate—plus, they’re bite-sized for easy serving.
Here’s how to make this show-stopping dessert:
Ingredients:
- 1 cup graham cracker crumbs
- 3 tbsp unsalted butter, melted
- 8 oz cream cheese, softened
- 1/3 cup granulated sugar
- 1 tsp vanilla extract
- 1 cup fresh strawberries, finely diced
- 8 oz semi-sweet chocolate chips or melting chocolate
- 1 tsp coconut oil (optional, for smoother chocolate coating)
- Heart-shaped silicone mold (optional but highly recommended)
Instructions:
1. Prepare the Crust
- In a small bowl, mix the graham cracker crumbs with the melted butter until the texture resembles wet sand.
- Press about 1 teaspoon of the mixture firmly into the bottom of each heart-shaped mold cavity. Place the mold in the freezer while you prepare the filling.
2. Make the Cheesecake Filling
- In a medium mixing bowl, beat the cream cheese, sugar, and vanilla extract until smooth and creamy.
- Gently fold in the finely diced strawberries until evenly distributed.
- Spoon the cheesecake mixture on top of the crust in the mold, filling each cavity almost to the top. Smooth the surface with the back of a spoon.
- Freeze the mold for at least 2 hours or until the cheesecake bites are firm and easy to remove.
3. Coat with Chocolate
- Melt the chocolate chips in a microwave-safe bowl in 30-second intervals, stirring between each until fully melted. Stir in the coconut oil for a shinier finish if desired.
- Remove the cheesecake bites from the mold and dip each one into the melted chocolate, ensuring they are fully coated. Use a fork to lift them out, letting any excess chocolate drip off.
- Place the chocolate-covered bites on a parchment-lined baking sheet.
- If you’d like, decorate with sprinkles, a drizzle of white chocolate, or edible glitter for an extra festive touch.
4. Chill and Serve
Place the baking sheet in the refrigerator for 20-30 minutes to allow the chocolate to set. Serve the bites chilled on a decorative plate or tiered dessert stand for a Pinterest-worthy presentation.
Tips for Success:
- Use high-quality chocolate for the best flavor and texture.
- Customize the filling by substituting strawberries with raspberries or cherries.
- Add a romantic touch by sprinkling crushed freeze-dried strawberries or edible rose petals on top before the chocolate sets.
Why This Dessert is Perfect for Valentine’s Day
These Heart-Shaped Chocolate-Covered Strawberry Cheesecake Bites are the ultimate combination of romance and indulgence. They’re easy to share, customizable, and almost too pretty to eat. Whether you’re hosting a Valentine’s Day dinner or surprising your loved one with a homemade treat, this dessert is sure to impress.
Take a picture before serving and share your creation on Pinterest or Instagram—you’ll be the talk of the dessert table! Happy Valentine’s Day and happy baking!